Many years ago I worked on a PHP based notes taking app named after a friendly cat in our family back then. I still use it from time to time, but because it's obsolete, time has come to give it a refresh.
A year ago I used Laravel to make an attempt at rewriting it. It was fun and the project got to a good form. However, I feel that a heavyweight framework like Laravel is a bit overkill for this small project. Thus I will make another attempt now, in a yolo React and SlimPHP project, with a mysql database.
More info:
Current situation
The current application has been developed somewhere around 2014-2015 with php, mysql, javascript, all mostly vanilla.
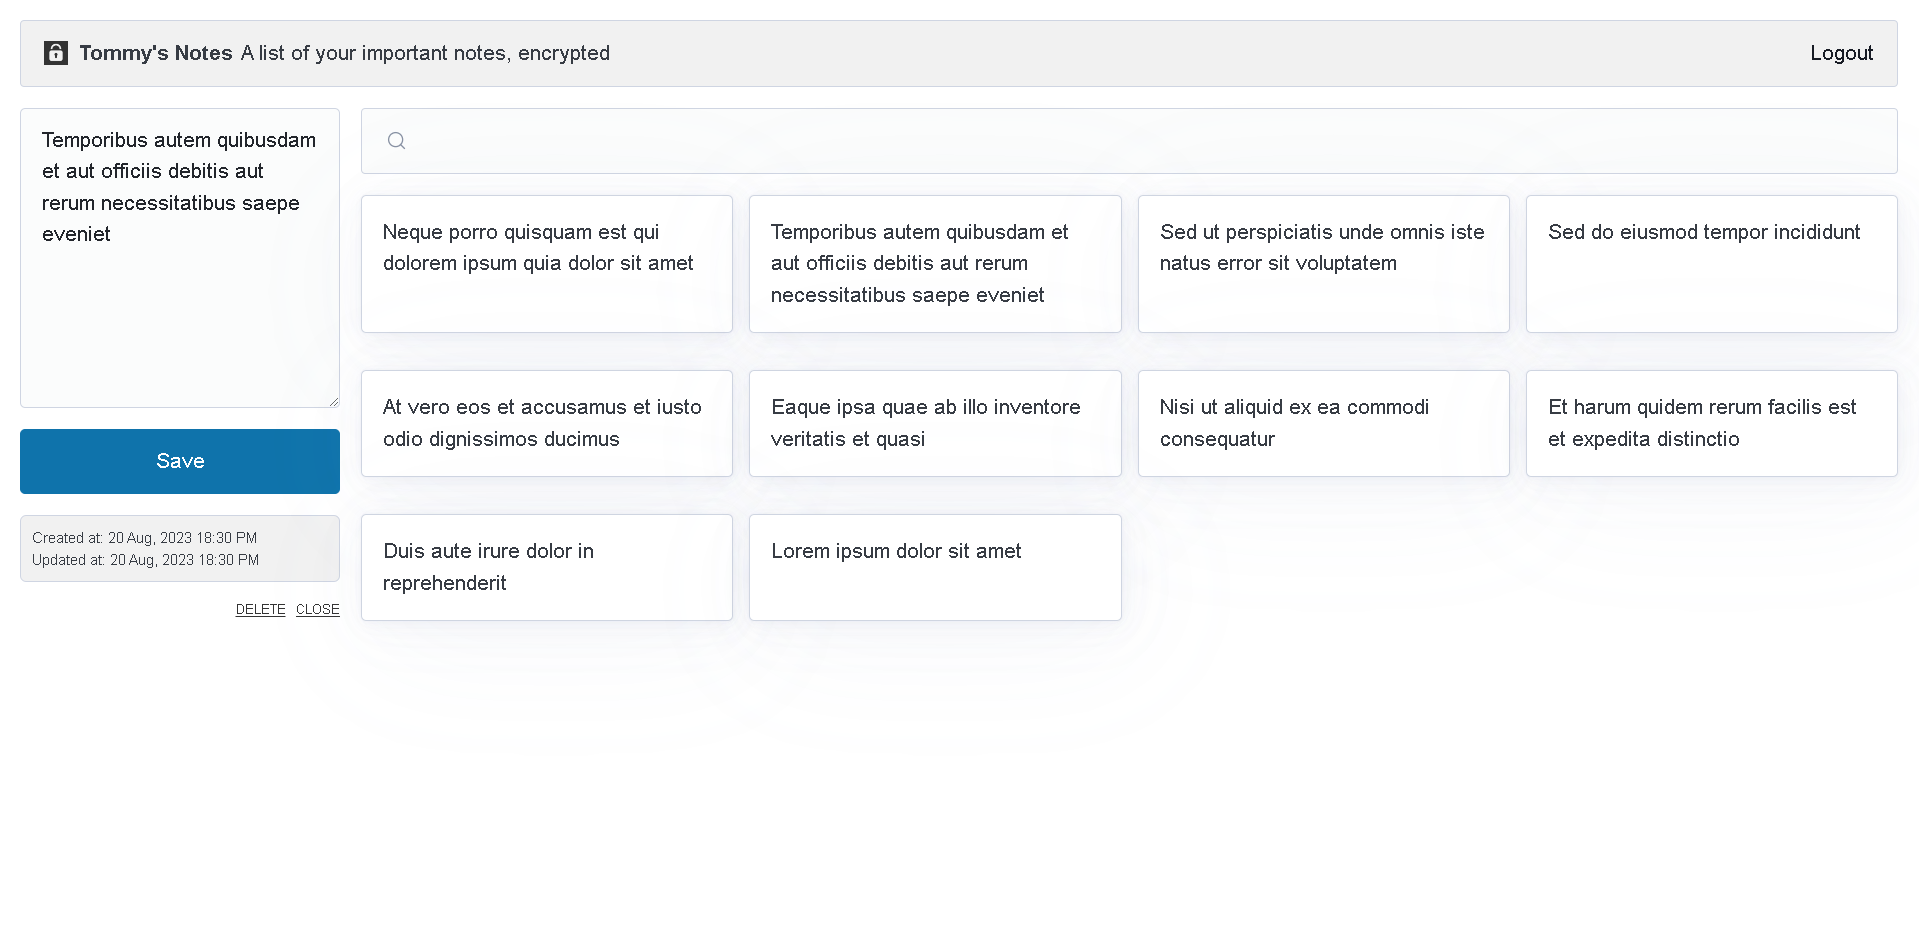
The application starts with a login form which receives the email / username and a password, a key for encryption and a phrase for scrambling the content of the notes.

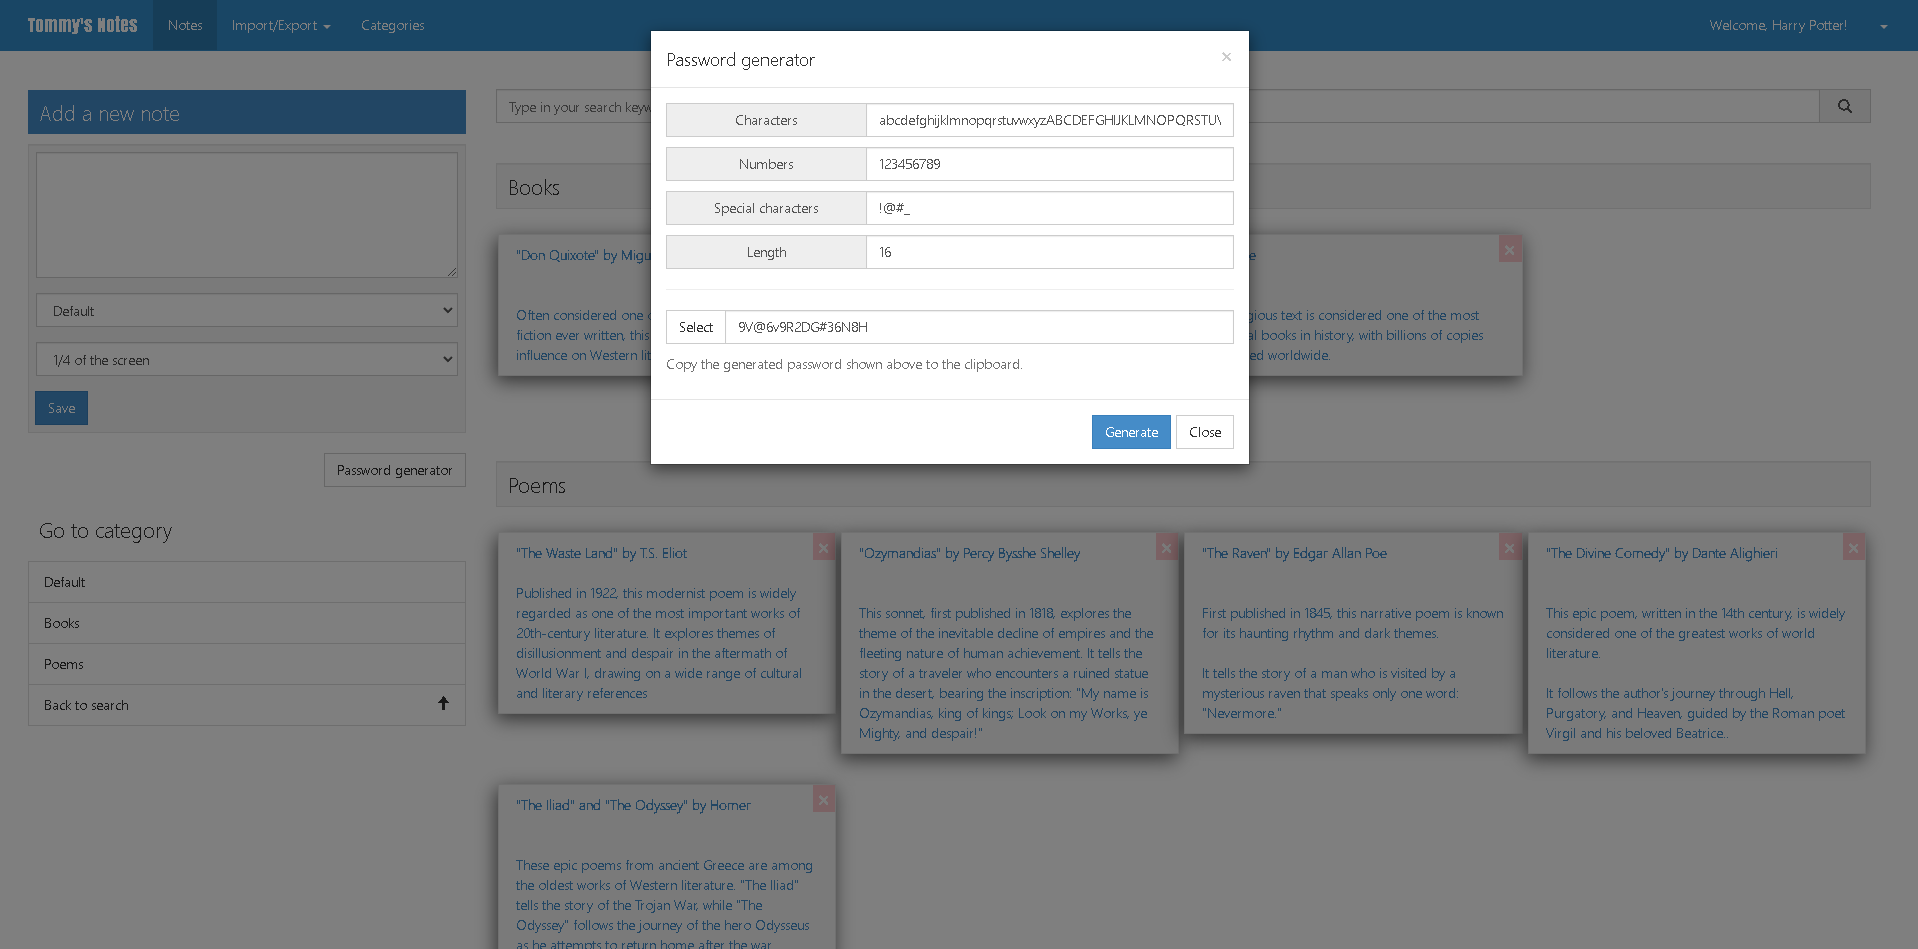
It is responsive and has a user management system, you can import and export notes and you can group them by categories, with custom themes and multiple languages. You also have the ability to generate random password.

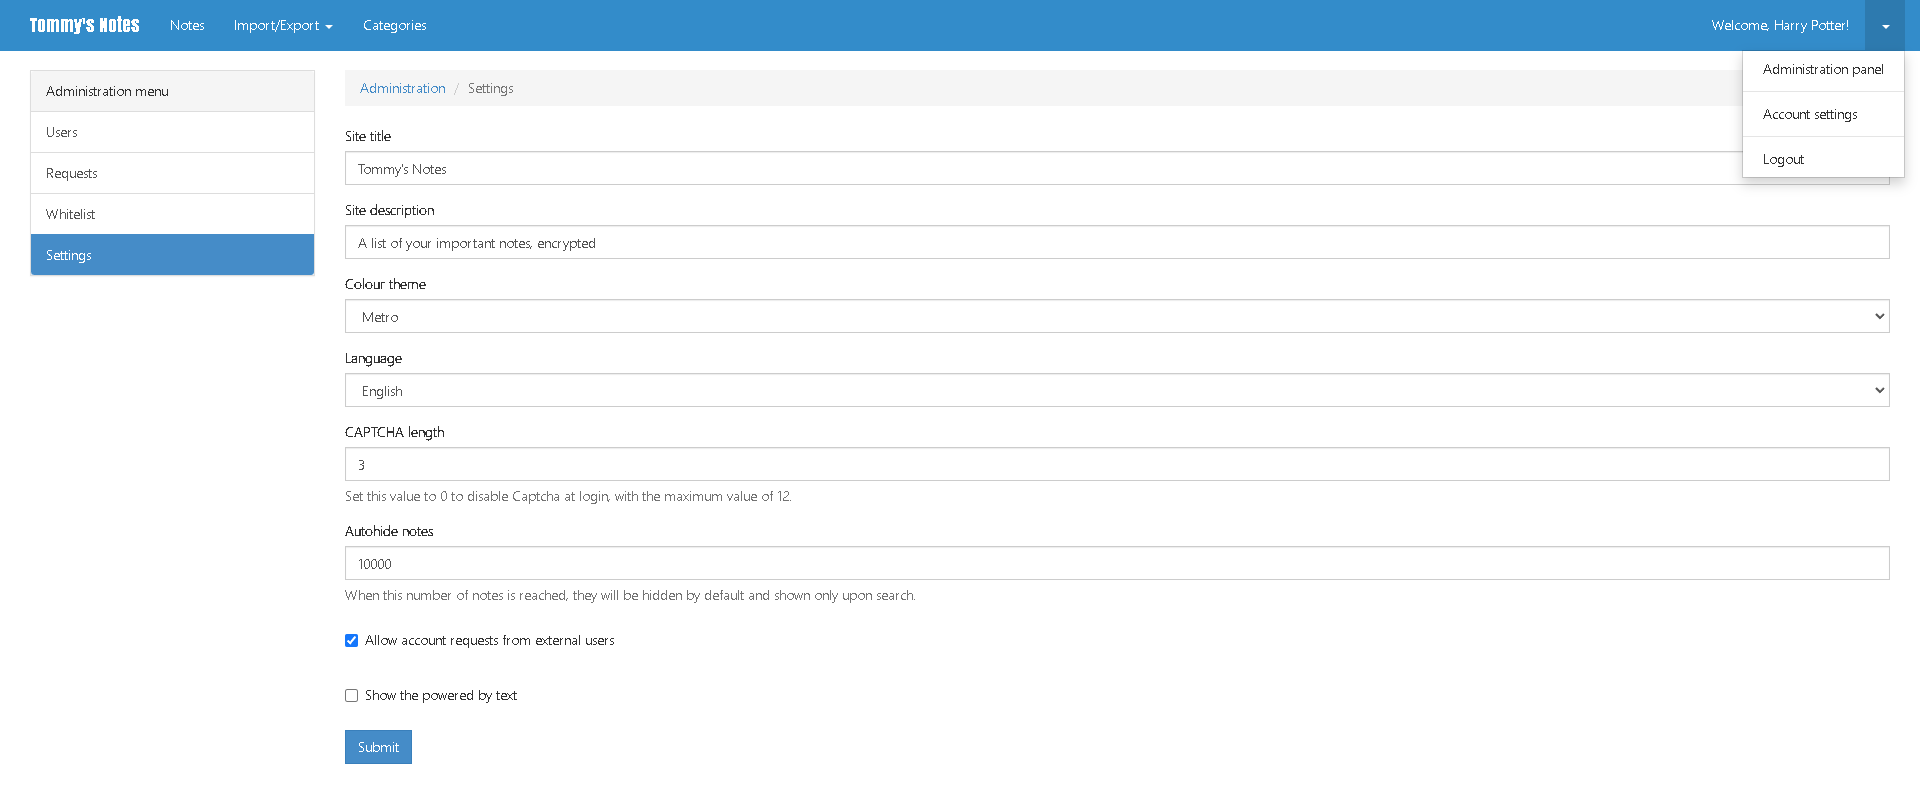
There are two types of accounts: normal users and administrators. As an administrator, you can use an extensive control panel to manage your application.
Decisions and solutions
A plan
The main decision is that we will not rebuild to feature complete. We will start with the main features (authentication, notes taking) and gradually add the other features we needed.
We will also try to improve on the solutions found at that time. Looking back, 2 major pain points which can easily be solved with today's tech stacks were automated end to end testing and a pipeline for releasing new versions.
Another thing to keep in mind is that we will update the legacy version with a docker configuration, for historical reasons, but also to be able to access it whenever we needed.
Environments
We will mainly have two environments: development and production.
The development environment for this project will be docker-compose based. It's been a long time since docker has been my go to tool for running services locally, mainly because you get that clean separation between what you need on your machine for writing code and what you need which is project specific.
For the so called production environment, we will assume a manually updated SQL database (we will have no abstraction over the SQL commands in this project) and have a bash script which will run the build commands and place the output at the proper location.
The file structure
The main folders in our project will be ./backend and ./frontend. As the name states, those will contain the main parts of our application.
Inside each of these folders, we will have the Dockerfile definitions for their representations in the docker-compose.yml file.
Another important folder is ./.data. Here we find a local representation of the files which need to be persistent or easily accessible for quick and easy development.
The .hooks folder contains git hooks which are to be applied related to our repository. This is a custom implementation which will be detailed later in this article.
README.md is the center of knowledge related to this repository. It goes without saying that this is the place where the interaction with this project should start.
.data/
|-- database/
|-- logs/
|-- ...
.hooks/
|-- pre-commit
|-- ...
backend/
|-- Dockerfile
|-- .htaccess
|-- index.php
|-- ...
frontend/
|-- Dockerfile
|-- src/
|-- package.json
|-- ...
.dockerignore
.gitignore
build.sh
dev.sh
docker-compose.yml
README.md
The downside of separating the project into ./backend and ./frontend might be that you will have to go inside the folders to run the project specific commands.
Packages and docker compose
With how we setup our docker compose file, it's important to pay attention at how the packages (npm and composer) are synchronized between the local machine and the docker containers.
version: "3.8"

services:
  vite:
    build:
      context: ./frontend
      dockerfile: Dockerfile
    restart: unless-stopped
    volumes:
      - /usr/src/app/node_modules # make sure that this folder is protected against sync
      - ./frontend:/usr/src/app
    ...

  php:
    build:
      context: ./backend
      dockerfile: Dockerfile
    restart: unless-stopped
    volumes:
      - /var/www/html/api/vendor # make sure that this folder is protected against sync
      - ./backend:/var/www/html/api
      - ./.data/php-logs:/var/log/apache2
    ...
  ...
networks:
  default:
    name: dev
Code language: PHP (php)
Read more:
- https://stackoverflow.com/questions/46786589/running-composer-install-within-a-dockerfile
- https://youtu.be/BSvzZvw_T64
dev and build
The ./dev.sh bash script will help you setup the development environment. What it does is:
- create the environment variables with defaults for the development environment;
- installs the dependencies locally, even if that's not really necessary if you use the docker-compose approach;
- sets up the git hooks for the project.
The ./build.sh allows for an easy build for your project on the production environment. One important aspect is that you can pass the destination path for the build as the first parameter directly, as in: bash ./build.sh ../public_html.
Monorepos
An alternative structure which I actually like is one with having a monorepo in mind.
The main upside for a monorepo in this case is that you get some slightly standardized structure out of the box.
It also comes together with other perks like running many of the commands you need from the root of the project. We will also be able to store and run at times the legacy application. Why? Maybe you need a feature check, maybe you are nostalgic, who knows 🙂
This is by design a small project and managed by very-very few people, so we will be far from using the full power of a monorepo. We will use nx with a basic implementation.
.hooks/
.nx/
apps/
|-- service
| |-- .data/
| | |-- mysql/
| | |-- .gitignore
| | |-- ...
| |-- src/
| |-- index.php
| |-- project.json
| |-- Dockerfile
| |-- docker-compose.yml
| |-- ...
|-- ui
| |-- src/
| |-- Dockerfile
| |-- docker-compose.yml
| |-- package.json
| |-- project.json
| |-- ...
|-- legacy
| |-- ...
scripts/
|-- build.sh
|-- dev.sh
|-- ...
nx
nx.bat
nx.json
...
Read more:
- https://monorepo.tools/
- https://nx.dev/
- https://nx.dev/recipes/adopting-nx/adding-to-existing-project
Git hooks
With having a focus on the frontend development lately, I am familiar and comfortable with the frontend tooling. The go-to tool for hooks related to actions in a repository is husky. It's a very nice tool which I warmly recommend.
However, given the structure for this project, implementing it feels.. wrong. I have decided that a better choice is to create a yolo implementation. 😸
How this works is pretty straightforward: it takes every hook which git provides and makes it look up in our project's structure and check if there is a custom hook with that name defined. If there is, then it executes it.
#!/usr/bin/env sh

# ./.hooks/_/setup.sh

HOOKS_SETUP_DIR=$(dirname -- "$(readlink -f -- "$BASH_SOURCE")")
HOOKS_DIR=$(dirname "$HOOKS_SETUP_DIR")

# Loop through all the .git/hooks and create scripts which include the contend of the ./hooks, if the hook exists
for sampleHook in $(ls .git/hooks); do
    # remove the .sample extension
    hook=$(echo $sampleHook | sed 's/.sample//g')

    if [ ! -f ".git/hooks/$hook" ]; then
        # create a file in the git hooks directory which includes the content of the hook
        echo "#!/bin/bash" > .git/hooks/$hook
        echo "if [ -f ./.hooks/$hook ]; then" >> .git/hooks/$hook
        echo ". ./.hooks/$hook" >> .git/hooks/$hook
        echo "fi" >> .git/hooks/$hook

        chmod +x .git/hooks/$hook
    fi
done

echo -e "\nHooks setup complete.";Code language: PHP (php)
Read more:
- https://git-scm.com/book/en/v2/Customizing-Git-Git-Hooks
- https://dev.to/krzysztofkaczy9/do-you-really-need-husky-247b
Frontend
The frontend will be based on React with vite. We will use typescript with it and picocss. We will use zustand for handling the state and zod for validating data.
Read more:
- https://react.dev/
- https://picocss.com/
- https://zod.dev/
- https://docs.pmnd.rs/zustand/getting-started/introduction
Backend
For the backend we will use PHP and SlimPHP. We will use odan/slim4-skeleton as base for ideas on how to make the features.
Read more:
Implementation
Authentication
We will use JWT tokens for authentication. We will use firebase/php-jwt for dealing with the JWT token server side. We will use DI for the JWT object and also create middleware which will be applied on the protected routes only.
In React, we will create a custom hook which handles security. For starters, to get the project going, we will use the config to store the [user, password] combinations and store the refresh token in localStorage.
Storing the refresh token there is not secure, thus not recommended, so the next step will be to use a httpOnly enabled cookie for the refresh token and use the memory to store the access token. So, if the page is refreshed, a call for a new access token will made using the refresh token.
More info:
- https://github.com/firebase/php-jwt
- https://youtu.be/27KeYk-5vJw
- https://security.stackexchange.com/questions/127966/access-control-allow-origin-with-a-bearer-token
CORS
For handling Cross-Origin Resource Sharing (CORS), we will use tuupola/cors-middleware. However, if we were to implement a solution ourselves, it would look something like this:
<?php
// Define strict types to ensure compatibility with PHP 7 and above
declare(strict_types=1);

namespace App\Middleware;

if (!defined('IS_INCLUDED')) {
    die('No direct access');
}

use Psr\Http\Message\ResponseInterface as Response;
use Psr\Http\Message\ServerRequestInterface as Request;

class CorsMiddleware
{
    protected $config;

    public function __construct($config)
    {
        $this->config = array_merge([
            'Access-Control-Allow-Origin' => '*',
            'Access-Control-Allow-Methods' => 'GET, POST, PUT, DELETE, OPTIONS',
            'Access-Control-Allow-Headers' => 'X-Requested-With, Content-Type, Accept, Origin, Authorization',
            'Access-Control-Allow-Credentials' => 'true',
        ], $config);
    }

    public function __invoke(Request $request, $handler): Response {
        // Allow from any origin
        $response = $handler->handle($request)
            ->withHeader('Access-Control-Allow-Origin', $this->config['Access-Control-Allow-Origin'])
            ->withHeader('Access-Control-Allow-Methods', $this->config['Access-Control-Allow-Methods'])
            ->withHeader('Access-Control-Allow-Headers', $this->config['Access-Control-Allow-Headers'])
            ->withHeader('Access-Control-Allow-Credentials', $this->config['Access-Control-Allow-Credentials'])
        ;

        // Handle preflight requests
        if ($request->getMethod() === 'OPTIONS') {
            return $response->withStatus(200);
        }

        return $response;
    }
}Code language: HTML, XML (xml)
Read more:
Toasts
We have a few toasts in the application. Since they are not too many and our application is aimed to be easy to maintain, we will use a package for the notifications. The chosen one is react-toastify.
With the current versions, picocss will conflict with react-toastify. You can use this fix in your css:
.Toastify {
  // Fix for toasts being hidden too fast from view with PicoCSS
  @media (prefers-reduced-motion: reduce) {
    * {
      &:not([aria-busy="true"]),
      &:not([aria-busy="true"])::before,
      &:not([aria-busy="true"])::after {
        animation-duration: 800ms !important;
      }
    }
  }
  // Styling for the colliding css in the close button
  &__close-button {
    background-color: var(--pico-background);
    color: var(--pico-text);
    border: none;
    margin: 0;
    padding: 0;
  }
}Code language: PHP (php)
More info:
Zustand
We will use zustand to manage the state of our application. It seems to be simpler than redux and the biggest advantage I see with it is that it can very easily be used outside the react components.
Since this is a small application, we could have easily used just a combination of Context and SWR to manage the state, but this felt like the right kind of project to try zustand on. Using a combination of the two is also possible, but it feels like we would overengineer a solution at this point.
More info:
- https://github.com/pmndrs/zustand/tree/main/docs/guides
- https://youtu.be/DK-S4ZcmDcE
- https://dev.to/madhuriskumar/zustand-react-query-the-future-of-fluent-state-management-4jm
Store structure
In the examples I have seen, I noticed an interesting approach on structuring the code: they separated the type of the store in multiple types which were used as a union for the store type. The final result was the same, but the code was much-much easier to read.
import { create } from "zustand";

type SecurityState = {
  token: string | null;
  initialized: boolean;
};

type SecurityActions = {
  handleInitialize: () => Promise<void>;
  handleLogin: (username: string, password: string) => Promise<void>;
  handleLogout: () => void;
};

const useSecurity = create<SecurityState & SecurityActions>((set, get) => ({
  initialized: false,
  token: null,

  handleInitialize: async () => {
    await new Promise((resolve, reject) => {
      setTimeout(() => {
        if (Math.random() >= 0.5) {
          set({ token: "retrievedToken" || null });
          resolve("");
        } else {
          reject("Failed to initialize");
        }

        set({ initialized: true });
      }, 1000);
    });
  },
  handleLogin: async (username, password) => {
    if (username === "admin" && password === "admin") {
      set({ token: "retrievedToken" });
    }
  },
  handleLogout: () => {
    set({ token: null });
  },
}));

export default useSecurity;Code language: JavaScript (javascript)
We used it in this project for a zustand store as an example, but actually it can be used in a much wider variety of situations, not necessarily related to this library.
Auto selectors
Selecting data from zustand in a React component is has some syntax boilerplate. It's recommended that you select the piece of the state you need as clearly as possible, as in this example:
import useSecurity from "@/stores/useSecurity";

const App = () => {
  const isInitialized = useSecurity((state) => state.initialized);
  ...
}Code language: JavaScript (javascript)
A shortcut can be auto generating selectors from the store. The function to be used is this one:
import { StoreApi, UseBoundStore } from 'zustand'

type WithSelectors<S> = S extends { getState: () => infer T }
  ? S & { use: { [K in keyof T]: () => T[K] } }
  : never

const createSelectors = <S extends UseBoundStore<StoreApi<object>>>(
  _store: S,
) => {
  let store = _store as WithSelectors<typeof _store>
  store.use = {}
  for (let k of Object.keys(store.getState())) {
    ;(store.use as any)[k] = () => store((s) => s[k as keyof typeof s])
  }

  return store
}Code language: JavaScript (javascript)
Since we are on the selectors topic, maybe it's worth mentioning the syntax you need to access state outside a react component:
// Get the token from the store if available
const getToken = () => {
  const token = useSecurity.getState().token;
  return token ? `Bearer ${token}` : "";
};Code language: JavaScript (javascript)
Read more:
- https://github.com/pmndrs/zustand/blob/main/docs/guides/auto-generating-selectors.md
- https://youtu.be/_ngCLZ5Iz-0?t=783
Better API requests
We will create a new util which will enable us to create new stores which include the capability to make api requests. Namely, the new stores will contain a request method, a currentStatus state and other getters and setters which might come in handy.
Read more:
Errors in the frontend
Handling errors is something we need to pay attention to, should we want a robust and reliable application. This is an important subject and going through the links with more information will be especially useful this time.
The first aspect we will deal with is how we will show the errors in our console. We will create a custom function which we will implement in the try { } catch {} blocks of our application.
/**
 * Logs data to the console if the environment is development
 *
 * @param data What to show in the console
 * @returns void
 */
export const devLog = <T>(data: T) => {
  if (!import.meta.env.DEV) {
    return;
  }

  console.log(data);
};
Code language: PHP (php)
Using this approach will easily enable us to extend on monitoring errors, should we feel the need for that. E.g. if we want to have them logged in an external service, we can just updated the content of this function and the whole application will be monitored.
Another interesting idea which should be outlined is the fact that errors should be rethrown for better tracing.
More info:
- https://stackoverflow.com/questions/54649465/how-to-do-try-catch-and-finally-statements-in-typescript
- https://engineering.udacity.com/handling-errors-like-a-pro-in-typescript-d7a314ad4991
- https://www.dhiwise.com/post/typescript-error-handling-pitfalls-and-how-to-avoid-them
- https://medium.com/with-orus/the-5-commandments-of-clean-error-handling-in-typescript-93a9cbdf1af5
Migrations and seeds
We will implement some simple database migrations using .sql files. We will keep track of the migrations which have been run using a table in the database and we will not have a rollback feature, as it's not expected to be needed.
We will create commands that can be run by php from the CLI, which will create migrations, seeds and run them. The structure of the table keeping track of the migrations will mainly store the name of the migration and the check will be only if it's filename is stored or not.
The file structure will be:
backend/
|-- bin/
| |-- console.php
|-- database/
| |-- migrations/
| | |-- 20240514185557_initial_structure.sql
| | |-- ...
| |-- seeds/
| | |-- 20240514185557_initial_data.sql
| | |-- ...
|-- src/
| |-- Console/
| | |-- MakeMigrationCommand.php
| | |-- MakeSeederCommand.php
| | |-- MigrateCommand.php
| | |-- SeedCommand.phpCode language: JavaScript (javascript)
Example run commands can be:
php bin/console.php migratephp bin/console.php seedphp bin/console.php make:migration create_categoriesphp bin/console.php make:seeder create_dummy_notes
We can also use composer.json to store some commands in the scripts section.
{
  ...
  "scripts": {
    "migrate": "php bin/console.php migrate",
    "seed": "php bin/console.php seed",
    "make:seeder": "php bin/console.php make:seeder --",
    "make:migration": "php bin/console.php make:migration --"
    ...
  },
  ...
}
Code language: JavaScript (javascript)
There are workarounds (e.g. create a dedicated container which waits for the backend and the db and maybe some extra seconds before running the migrations), but currently we only run the migrations manually both in dev and production.
Read more:
Tests
The main suite of tests will be a Cypress based e2e test suite which will ensure that every new feature does not break our project.
Read more:
The final result
The final result is a modern much more simple application. It has been stripped of most of the features which were not used, updated to newer frameworks and libraries and also enriched with a simpler way for being extended in a more reliable way.