Testing an application is more important than one might think. The two best reasons that come to mind is quality assurance and the time you save by using them.
I imagine that all developers do the minimal manual testing for their applications 🙂 , so the point of this article is to talk about the automated side of tests. The general idea is that that better coverage with automated tests you have, the more confidence you have when shipping your features.
We might slightly get into the nitty gritty of implementing tests on the frontend side of testing. We will focus on React, but the information can be applied to other libraries or frameworks, as well.
The testing pyramid
The testing pyramid is a fundamental concept in software development which groups tests into buckets. There are many variations of the testing pyramid, one for which is the following.
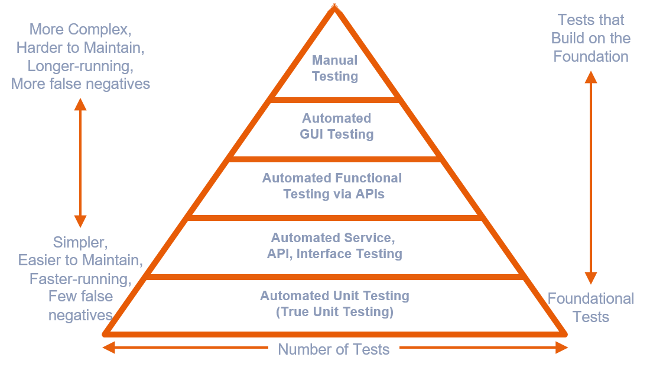
The idea is that the lower you are on the pyramid, the cheaper it is to run the test. So, to put it simple, it's cheaper to run a unit test, than an end to end or a manual one.
Read more:
Types of tests

As a frontend developer, you should minimally be aware of the existence and meaning of the following terms:
- unit tests - made for specific components of the application, in isolation from other components;
- integration tests - made to test that multiple components of the app are properly working together;
- end-to-end tests - checks which mimic the behavior of the user.
Read more:
- https://www.softwaretestinghelp.com/types-of-software-testing/
- https://www.smashingmagazine.com/2020/07/react-apps-testing-library/
General considerations
In the next part of the article I will address some of the things to keep in mind when testing your application. These are mere suggestions about how to better address the testing aspect in the development of your application. They are presented in a randomly, so don't look too much into the way they are ordered.
Here are some ideas about how to test your code:
- It's not ideal to say this, but I think that in frontend it's hard to be confident when releasing. I like to mainly mimic the happy path in e2e testing and put an emphasis on failing tests in unit tests;
- in general, I try to write the failing tests first, then write the happy path;
- I think that code coverage should be around 80% and the aim should be to test the complex parts of the code (e.g. it makes little sense to test getters and setters). However, it's important to make note of the indirect tests that can be applied on the not tested codes - with considering them, you might easily get above the minimal 80% mentioned;
- a nice idea is that you should test the contracts, instead of the implementation.
See more:
- https://youtu.be/UBXXw2JSloo
- https://youtu.be/02FD59whT5A
- https://blog.logrocket.com/javascript-testing-best-practices/
- https://www.lambdatest.com/blog/javascript-testing-best-practices-you-should-know/
Keep your code clean
Here are some ideas about how to write your tests:
- be descriptive when naming your variables;
- define a consistent naming convention;
- try to avoid duplication as much as possible (e.g. create helper functions when actions are repeated throughout your tests);
- try not to hardcode values within your tests, maybe use constants / config files;
- be explicit about your assertions (e.g. define
expectedValueandactualValueabove the assertion, should that help with readability); - try to keep the tests as clear as possible by adding comments and spacing between the lines of code (use the AAA pattern, described below);
- where it makes sense, try to keep the test data separated from the test itself;
- keep the test cases short, focused and meaningful;
- add comments whenever the test name is not explicit enough.
AAA pattern in testing
AAA in the case of testing stands for Arrange-Act-Assert. Structuring the code of your test in this manner will ensure simplicity and clarity, thus a lower cost of maintenance.
In the Arrange phase, we will set all the conditions needed for the test to run. In the Act phase, we will perform the action that is being tested. In the Assert phase, we will check if the expected result happened.
The happy path and the sad path
In testing, the happy path refers to the standard error free flow which users are expected to use while exploiting the application.
The sad path, also referred to as the unhappy path or the error path, tests the scenarios where the users encounter errors, exceptions and edgy cases.
A good practice in writing tests is to address the error paths first and finally deal with the happy path.
Git hooks
A good way to run the tests in your application is by integrating them with the git hooks. In the context of javascript/typescript applications, husky is one of the main packages used to deal with the git hooks.
One suggestion is to run the tests on the pre-commit or pre-push hooks.
A test in itself could be running the build command itself on one of these hooks, preferably on the pre-push. Even if it might not seem like it, testing the build command before pushing might help you avoid unexpected issues.
Coverage
In my opinion, having 100% test coverage is not the right goal to set. The reason behind it is that tests must have a clear object and be useful. Rarely, but it might happen that certain parts of the application might not need to be included.
In general, thinking of an 80% coverage as a target for your coverage should suffice. But this is to be established on a case by case basis.
Another thing we can take into consideration is that we cover the whole application in different kinds of tests. So, 80% smoke tests, 80% of unit tests and 80% of e2e tests in coverage might sum up to 100% coverage for the whole application.
Personas
A persona can be defined as a certain role or character attributed to a user of the application. You might think of a persona as in Jane, who is an admin in the application or Jim who is a simple user. This concept is used more in UAT (user acceptance testing) and is more associated with the UX aspect of the application.
T.D.D.
TDD or Test Driven Development is a development technique where the tests are written first and only after the code for the application. So, the tests are written, then the code, then the tests are run - which is also known as the red-green-refactor cycle.
TDD helps with writing modular and testable code, often helping with addressing the issues early in the development process. By writing the tests upfront, the developers can avoid or identify and fix bugs easier.
One of the main benefits, though, is the high level of confidence when refactoring. Since the code is backed by a comprehensive suite of tests, regressions will be generally caught by the tests. This will ensure good quality for the delivered, in the end.
Implementation
We will setup the tests for a vite based frontend application. This is how most of my latest projects are based on and given that npx create-vite does not come with an option for tests, I imagine it's one of the most useful examples.
The aim is to create a clean base for the tests. We will have basic commands in our npm package, but they can surely be improved.
Cypress
You can setup cypress for both unit and e2e tests. It's a complete and mature tool for creating tests. However, many developers still prefer it only for running e2e.
Install with the following commands:
npm i -D cypressnpx cypress open
Next, we will want to create a custom ./cypress/tsconfig.json file:
{
  "compilerOptions": {
    "types": ["cypress", "@testing-library/cypress"]
  }
}Code language: JSON / JSON with Comments (json)
Now we need to setup the baseUrl for the application we want to test. We will add commented code for other possible options:
// ./cypress.config.ts

import { defineConfig } from 'cypress'

export default defineConfig({
  video: false,
  e2e: {
    baseUrl: 'http://localhost:5173',
    // specPattern: 'cypress/e2e/**/*.{cy,spec}.{js,jsx,ts,tsx}',
    // screenshotOnRunFailure: true,
    // video: false,
    // viewportWidth: 1920,
    // viewportHeight: 1080,
    // supportFile: 'cypress/support/e2e.ts',

    // setupNodeEvents(on, config) {
    //   on('before:browser:launch', (_, launchOptions) => {
    //     // passing the environment variables to the browser
    //     launchOptions.args.push(`--env=API_URL=${config.env.API_URL}`)
    //     return launchOptions
    //   })
    // },
  },
})Code language: JavaScript (javascript)
To run cypress from the command line with one command, we will add a helper package:
npm i -D start-server-and-test
For ease of use, one should add the following extra scripts to the ./package.json file:
{
  ...
  "scripts": {
    ...
    "cy:open": "cypress open",
    "cy:run": "cypress run",
    "cy:test": "start-server-and-test dev http://localhost:5173 'npm run cy:run'"
  },
  ...
}Code language: JavaScript (javascript)
Remember to add the uptates to the ./.gitignore file:
# .gitignore

# Tests
/cypress/videos
/cypress/screenshotsCode language: PHP (php)
The first test can be something like:
// ./cypress/e2e/happy-path.cy.ts

describe('base', () => {
  it('loads the app', () => {
    cy.visit('/')
    cy.contains('Welcome!')
  })
})Code language: PHP (php)
For a more pleasant experience while writing tests, you can add some helpers:
npm i -D @testing-library/cypress- then update the
./cypress/support/commands.tsby adding the following lines:/// <reference types="@testing-library/cypress" />import '@testing-library/cypress/add-commands'
Read more:
- https://docs.cypress.io/guides/getting-started/installing-cypress
- https://docs.cypress.io/guides/component-testing/react/overview
- https://www.freecodecamp.org/news/cypress-for-end-to-end-testing-react-apps/
- https://youtu.be/u8vMu7viCm8
- https://github.com/cypress-io/cypress/issues/15615
- https://github.com/cypress-io/cypress-example-todomvc-redux
- https://stackoverflow.com/questions/58999086/cypress-causing-type-errors-in-jest-assertions
Playwright
Playwright is an interesting alternative to Cypress. It has a slightly different syntax and more stars on github. 🙂
More info:
- https://playwright.dev/
- https://www.browserstack.com/guide/playwright-vs-cypress
- https://youtu.be/OCGef6H09fI
- https://youtu.be/kqJSrSU9DPY
The Testing Library
The Testing Library simplifies tests for javascript based projects. It focuses on simulating the user behavior and asserting the outcomes.
On the one hand, jest provides a comprehensive test suite with additional features and a wide community support, but on the other vitest gives seamless integration with a vite based project.
Read more:
- https://www.freecodecamp.org/news/write-unit-tests-using-react-testing-library/
- https://vitest.dev/guide/comparisons.html
jest
Jest is the classic way for running unit tests in a frontend application, so this comes with most of the problems you can think of already solved.
The first step will be to install the dependencies:
npm i --save-dev jest jest-environment-jsdom jest-transformer-svg identity-obj-proxy @testing-library/jest-dom @testing-library/react @testing-library/user-event @types/jest ts-jest
Then we will create two files which are needed by jest:
// ./jest.config.ts

export default {
  rootDir: '.',
  preset: 'ts-jest',
  testEnvironment: 'jsdom',
  transform: {
    '^.+\\.tsx?$': ['ts-jest'],
  },
  moduleNameMapper: {
    '\\.(css|less|sass|scss)$': 'identity-obj-proxy',
    '^.+\\.svg$': 'jest-transformer-svg',
    '@/(.*)': '<rootDir>/src/$1',
  },
  setupFilesAfterEnv: ['<rootDir>/jest.setup.ts'],
  moduleFileExtensions: [
    // Place tsx and ts to beginning as suggestion from Jest team
    // https://jestjs.io/docs/configuration#modulefileextensions-arraystring
    'tsx',
    'ts',
    'web.js',
    'js',
    'web.ts',
    'web.tsx',
    'json',
    'web.jsx',
    'jsx',
    'node',
  ],
  modulePaths: ['<rootDir>/src'],
}Code language: JavaScript (javascript)
// jest.setup.ts
import '@testing-library/jest-dom'Code language: JavaScript (javascript)The next think we must do is update the ./tsconfig.json:
{
  "compilerOptions": {
    ...

    /* Jest */
    "esModuleInterop": true,
  },
  "include": [
    ...
    "./jest.setup.ts"
  ],
  ...
}Code language: JavaScript (javascript)
The last step from the installation is to update package.json and add the commands to run the tests:
{
  ...
  "script": {
    ...
    "test": "jest --watchAll=true",
    "test:coverage": "jest --coverage"
  }
  ...
}Code language: JavaScript (javascript)
Remember to add /coverage to your ./.gitignore file.
The first test can look something like this:
// ./src/__tests__/App.test.tsx

import { render, screen } from '@testing-library/react'
import App from '../App'

describe('App', () => {
  it('should render the <main/> element', () => {
    render(<App />)
    expect(screen.getByRole('main')).toBeInTheDocument()
  })
})Code language: JavaScript (javascript)
Read more:
- https://testing-library.com/docs/react-testing-library/example-intro/#full-example
- https://dev.to/hannahadora/jest-testing-with-vite-and-react-typescript-4bap
- https://hung.dev/posts/jest-vite
- https://stackoverflow.com/questions/57861187/property-tobeinthedocument-does-not-exist-on-type-matchersany
- https://coderslegacy.com/jest-for-react-apps-with-vite-and-typescript/
- https://stackoverflow.com/questions/50863312/jest-gives-cannot-find-module-when-importing-components-with-absolute-paths
- https://dev.to/teyim/effortless-testing-setup-for-react-with-vite-typescript-jest-and-react-testing-library-1c48
Environment variable issues
Vite uses import.meta to handle environment variables, which does not sit well with our implementation of jest. It will result in and error which looks something like this:
TS1343: The 'import.meta' meta-property is only allowed when the '--module' option is 'es2020', 'esnext', or 'system'.
One good way to go about this is to have your import.meta.env handled in a dedicated file and then mock the import of that file in your tests. Even if it wouldn't be a big change, it's not ideal that you change your codebase to accommodate the tests.
The cleanest way to fix this issue (which comes with the downside that you have to remember to update the jest config every time you add a new env variable) is by using a special package which replaces the imports. To use this approach, first install the package:
npm install -D ts-jest-mock-import-meta
The next step is to update the configuration of jest:
// ./jest.config.ts

const meta = {
  env: {
    VITE_API_PATH: 'http://localhost:3001',
    PROD: false,
    DEV: true,
  },
}

export default {
  ...
  transform: {
    '^.+\\.tsx?$': [
      'ts-jest',
      {
        diagnostics: {
          ignoreCodes: [1343],
        },
        astTransformers: {
          before: [
            {
              path: 'node_modules/ts-jest-mock-import-meta',
              options: {
                metaObjectReplacement: {
                  ...meta,
                },
              },
            },
          ],
        },
      },
    ],
  },
  ...
}Code language: JavaScript (javascript)
Read more:
- https://stackoverflow.com/questions/70440505/ts1343-the-import-meta-meta-property-is-only-allowed-when-the-module-opti
- https://www.npmjs.com/package/ts-jest-mock-import-meta
vitest
vitest is said to be faster than jest. I haven't benchmarked it in any way, I imagine it's true. I also think it plays better with vite. However, a downside I have experienced myself is that it was harder to create some mocks I needed, by comparison with jest.
The first step is to install the necessary libraries:
npm i -D vitest jsdom @testing-library/dom @testing-library/jest-dom @testing-library/react @testing-library/user-event @vitest/coverage-v8
Next we will create the setup file:
// vitest.setup.ts

import '@testing-library/jest-dom'Code language: JavaScript (javascript)
After this, we have to update the ./vite.config.ts and the tsconfig.json files:
// ./vite.config.json

/// <reference types="vitest" />
/// <reference types="vite/client" />

...

export const config = {
  ...
  test: {
    globals: true,
    environment: 'jsdom',
    setupFiles: './vitest.setup.ts',
    // you might want to disable it, if you don't have tests that rely on CSS
    // since parsing CSS is slow
    css: true,
  },
}

// https://vitejs.dev/config/
export default defineConfig(config)
Code language: JavaScript (javascript)
// tsconfig.json
{
...
"include": [
...
"vitest.setup.ts"
],
...
}Code language: JavaScript (javascript)The last step is to update the package.json to contain the commands to run the tests:
{
  ...
  "script": {
    ...
    "test": "vitest --watchA=true",
    "test:coverage": "vitest --coverage"
  }
  ...
}Code language: JavaScript (javascript)
Remember to add the /coverage folder to your .gitignore.
The first test should look like this:
// ./src/__tests__/App.test.tsx

import { describe, expect, it } from 'vitest'
import { render, screen } from '@testing-library/react'

import App from '../App'

describe('App', () => {
  it('should render the <main/> element', () => {
    render(<App />)
    expect(screen.getByRole('main')).toBeInTheDocument()
  })
})Code language: JavaScript (javascript)
Read more:
- https://dev.to/annietaylorchen/how-to-set-up-vite-react-ts-project-with-vitest-2f8d
- https://medium.com/@nedopaka/setup-a-react-vite-project-with-prettier-vitest-2024-12e291669b4b
vitest in the browser
An interesting package is the @vitest/ui package, which gives you the option to see the output of the tests in the browser. Once you have installed the package, all you need to do is run vitest --ui, which can also be a script command in your ./package.json file.
Read more: