We previously tackled the topic of setting up a Raspberry Pi home server and that implementation is still up and running. It was pretty basic, so now it's time for some improvements.
This is the first part for setting up a the new Pi Server and it deals with setting up the machine. The part where we set the OS and the services will soon follow.
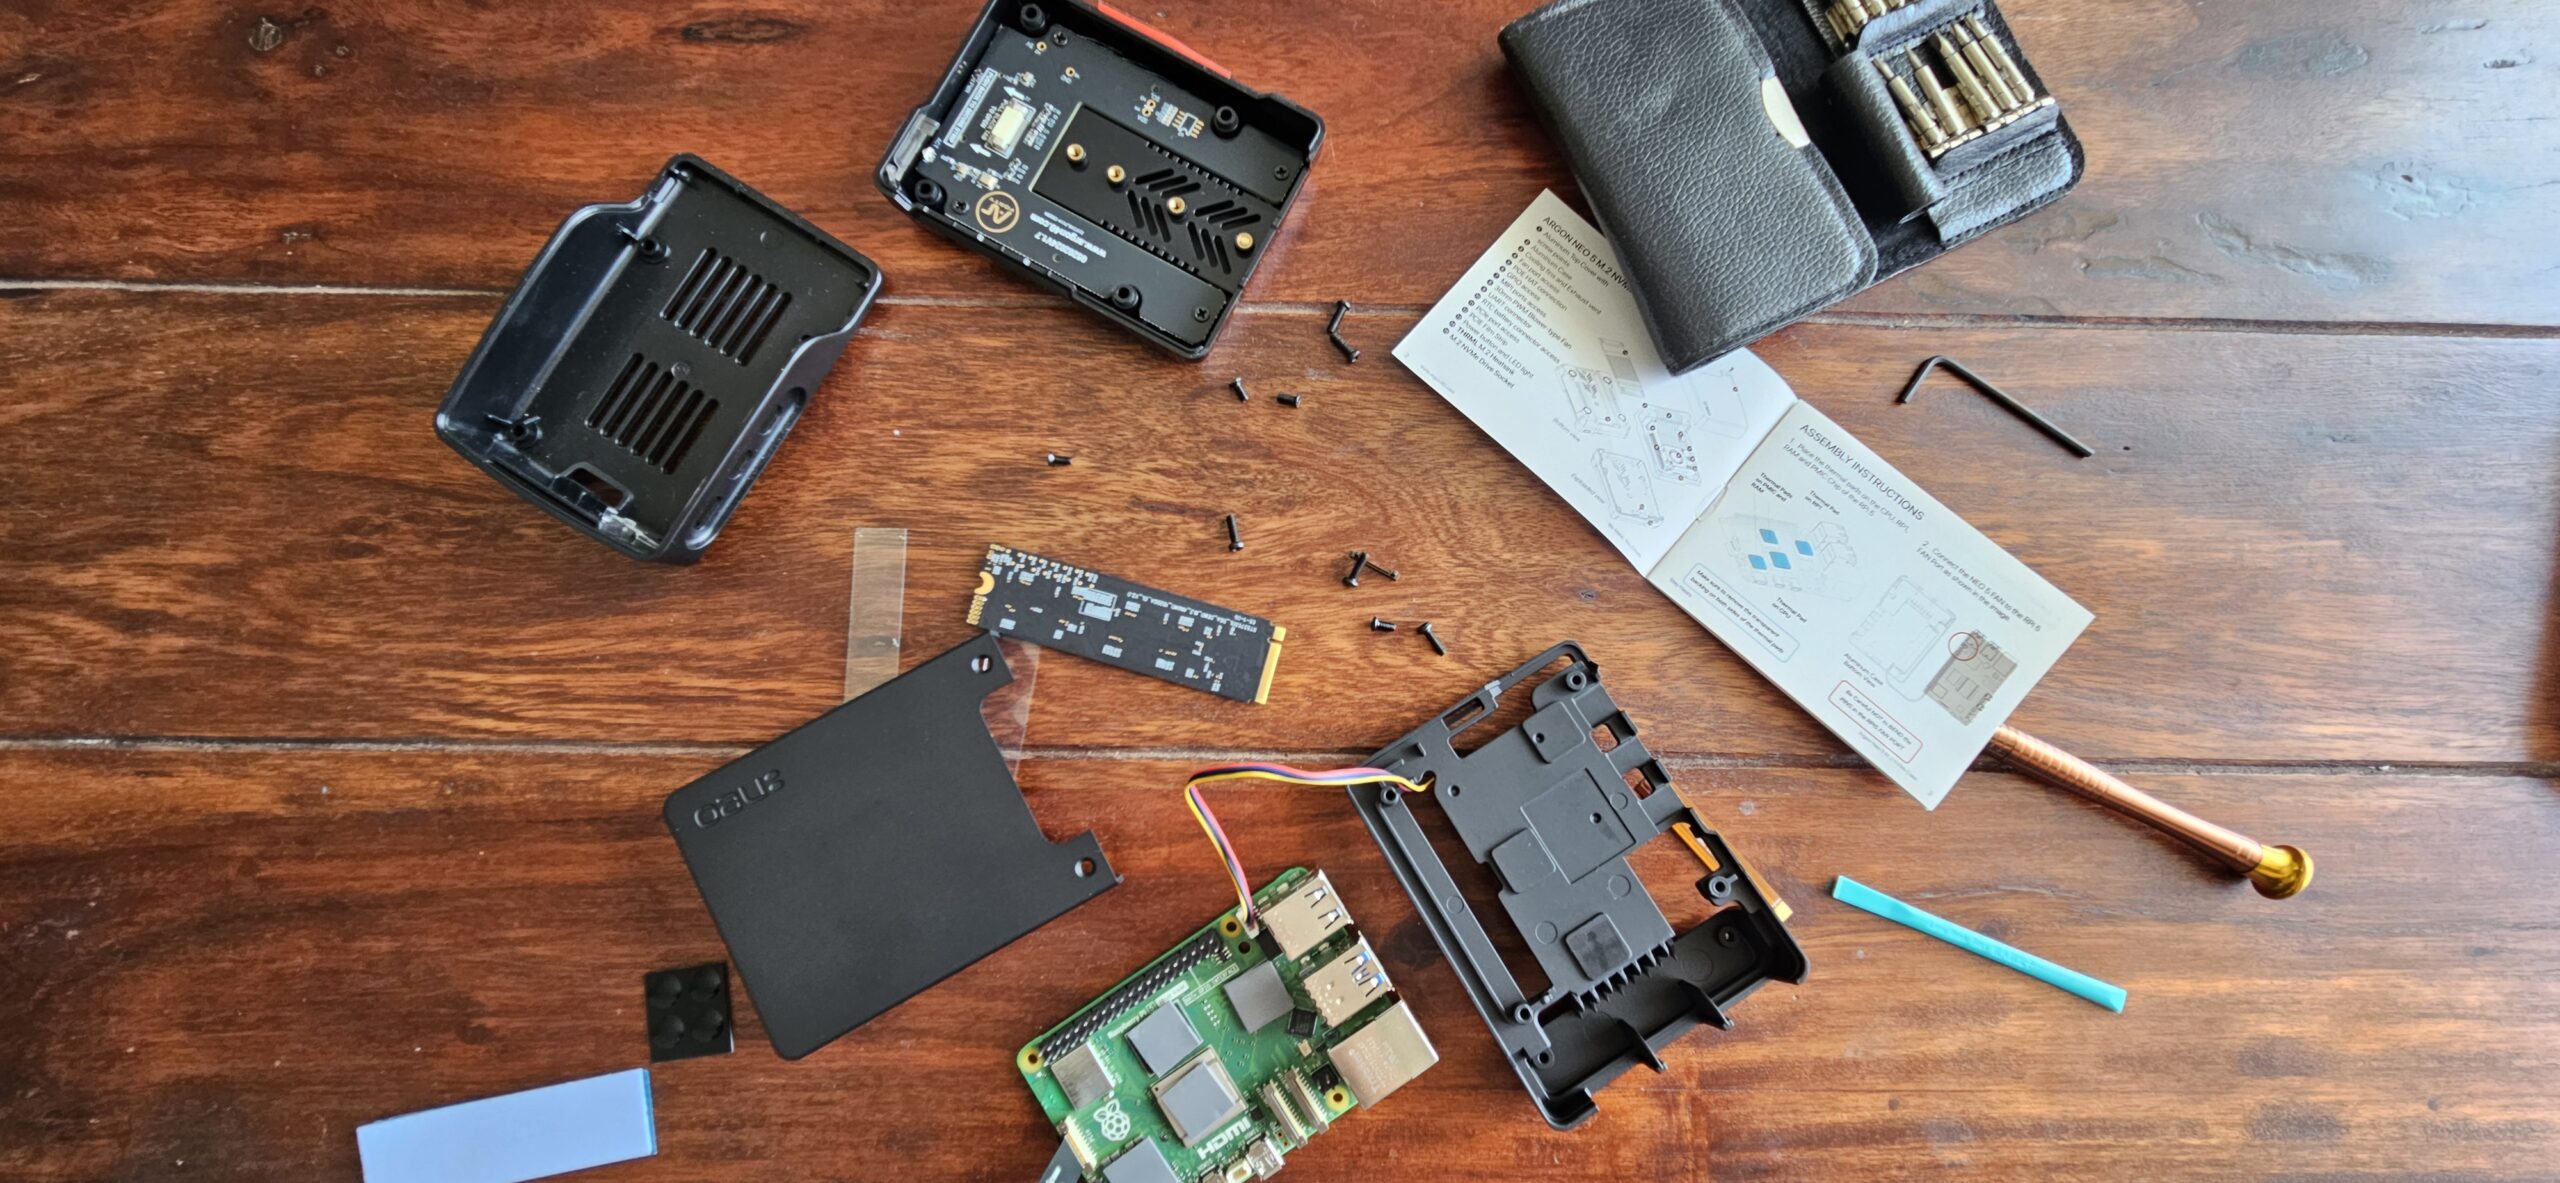
We will use a Raspberry PI, in its 16 GB version together with an Argon Neo 5, NVMe with a Kingston NV2, 2 TB SSD.
One thing we need to have in mind which is rarely mentioned in the tutorials, is that you might want to install the OS on the SSD before doing the whole build. In this tutorial, we will start with a previously set SD card and an empty ssd.
Read more:
Assemble the Argon Neo 5 case
Getting the Pi started is something pretty straightforward. However, turns out that the Argon Neo 5 assembly was a bit trickier than I expected and I had to actually read though the small instructions book. 🙂
Once the hardware is setup, we need to execute the following commands:
curl http://download.argon40.com/argon-eeprom.sh | bashsudo rebootcurl https://download.argon40.com/argonneo5.sh | bashsudo reboot
The following 2 commands will show that the boot device is the SD card and if the SSD is available:
df /boot -h
Filesystem Size Used Avail Use% Mounted on
/dev/mmcblk0p2 114G 2.7G 106G 3% /Code language: PHP (php)
lsblk -o NAME,FSTYPE,SIZE,MOUNTPOINT,LABEL
NAME FSTYPE SIZE MOUNTPOINT LABEL
mmcblk0 116.1G
├─mmcblk0p1 vfat 512M /boot/firmware bootfs
└─mmcblk0p2 ext4 115.6G / rootfs
nvme0n1 1.9T
More info:
Put the OS on the SSD
As mentioned above, we start with the Raspberry Pi OS on an SD card. It is the situation in which many of us will find ourselves. Should we decide to remove the SSD and install the OS directly, with a few clicks we will be done, in a clean install of the system. But that is too easy for us 🙂
Out of the multiple ways to go about this, the choice is to install everything we need on the SD card, then copy the OS to the SSD, then use the SSD as the main boot device. With this approach, should we ever have a failure in the OS on the SSD, we will always be able to start from the SD card and recreate our system.
More info:
Partition the SSD and copy the OS
So, the first and most important thing to mention is that you should backup your data, if there is any. We will have to partition the disk, which is a risky operation with sometimes leads to data loss.
A nice to have is a way to actually see what is going on in your raspberry pi, so having a usb keyboard and a monitor with the proper cable connection could save you some time with debugging.
With fdisk we need to create two new partitions, bootfs and rootfs:
sudo fdisk /dev/nvme0n1- g (create a new empty gpt partition table)
- n (new partition)
- 1 (parition number)
- enter key for default first sector
- +512M (last sector, 512MB size)
- t (change the partition type)
- 1 (vfat for boot)
- n
- 2
- enter for default first sector
- enter for default last sector
- t
- 2
- 20 (ext4, the linux filesystem)
- n (new partition)
- p (preview the current configuration)
Disk /dev/nvme0n1: 1.86 TiB, 2048408248320 bytes, 4000797360 sectors
Disk model: Realtek_nvme2T
Units: sectors of 1 * 512 = 512 bytes
Sector size (logical/physical): 512 bytes / 512 bytes
I/O size (minimum/optimal): 512 bytes / 512 bytes
Disklabel type: gpt
Disk identifier: 2EA83AE2-617C-522F-9194-03278131C935

Device           Start        End    Sectors  Size Type
/dev/nvme0n1p1    2048    1050623    1048576  512M EFI System
/dev/nvme0n1p2 1050624 4000796671 3999746048 1.9T Linux filesystemw(write the current configuration)
Once the partitions are created, we need to format them:
sudo mkfs.vfat -F 32 /dev/nvme0n1p1sudo mkfs.ext4 /dev/nvme0n1p2
Then we need to mount the partitions:
sudo mkdir -p /mnt/sd_boot /mnt/sd_rootsudo mkdir -p /mnt/nvme_boot /mnt/nvme_rootsudo mount /dev/mmcblk0p1 /mnt/sd_bootsudo mount /dev/mmcblk0p2 /mnt/sd_rootsudo mount /dev/nvme0n1p1 /mnt/nvme_bootsudo mount /dev/nvme0n1p2 /mnt/nvme_root
The next step is to start copying the data:
sudo rsync -ah --progress /mnt/sd_boot/ /mnt/nvme_boot/sudo rsync -ah --progress --exclude=/mnt/sd_root/* /mnt/sd_root/ /mnt/nvme_root/
Now, we need to get the PARTUUIDs for the new partitions, to edit fstab:
sudo blkid /dev/nvme0n1p1sudo blkid /dev/nvme0n1p2sudo nano /mnt/nvme_root/etc/fstab
Please note that this is the fstab file on the nvme drive. This means that any changes we do here only affect the OS on the SSD. So here, replace the PARTUUIDs:
- for
/use the value in the output ofsudo blkid /dev/nvme0n1p2 - for
/boot/firmwareuse the value in the output of/dev/nvme0n1p1
Also, we need to update the id of the boot drive in the cmdline.txt file, where it's very-very important to use the nvme0n1p2 id:
sudo nano /mnt/nvme_boot/cmdline.txt- replace the value of
root=PARTUUID=with that corresponding to/dev/nvme0n1p2
The last step here is to unmount the patitions:
sudo umount /mnt/sd_boot /mnt/sd_root /mnt/nvme_boot /mnt/nvme_rootsudo rm -r /mnt/sd_boot /mnt/sd_root /mnt/nvme_boot /mnt/nvme_root
At this point, the output of lsblk -o NAME,FSTYPE,SIZE,MOUNTPOINT,LABEL should be:
NAME FSTYPE SIZE MOUNTPOINT LABEL
mmcblk0 116.1G
├─mmcblk0p1 vfat 512M /boot/firmware bootfs
└─mmcblk0p2 ext4 115.6G / rootfs
nvme0n1 1.9T
├─nvme0n1p1 vfat 512M
└─nvme0n1p2 ext4 1.9T
Read more:
- https://codedoneright.eu/?page_id=670
- https://raspberrypi.stackexchange.com/questions/107499/how-do-i-expand-the-file-system-on-a-raspberry-pi-4-manually
- https://raspberrytips.com/fdisk-linux-command/
Boot from the SSD
To boot from the SSD we will use the raspberry pi configuration tool:
sudo raspi-config- Go to "Advanced options"
- Go to "Boot order"
- Select "NVMe/USB Boot"
- Choose "Finish" and reboot the Pi.
Check your boot drive with:
df /boot -h
In case the changes are not made, you can manually update your configuration:
sudo -E rpi-eeprom-config --edit- make this change:
BOOT_ORDER=0xf41 - save and reboot
The output of df /boot -h should be something like:
Filesystem Size Used Avail Use% Mounted on
/dev/nvme0n1p2 1.9T 2.8G 1.8T 1% /Code language: PHP (php)
Read more:
AI generated script
In the age of AI, which is still freely accessible if we don't mind the cost to our environment 🙂 , of course we should ask it for help. Google Gemini generated the following script to help with all the operations above.
#!/bin/bash

# --- IMPORTANT WARNINGS ---
echo "************************************************************************"
echo "* DANGER ZONE                                 *"
echo "* This script automates disk operations. Incorrect use can lead to     *"
echo "* PERMANENT DATA LOSS. Ensure you have backups and understand each step.*"
echo "* *"
echo "* This script ASSUMES you have ALREADY manually partitioned /dev/nvme0n1*"
echo "* with two partitions:                                                 *"
echo "* /dev/nvme0n1p1 (for boot, vfat) - approx 512MB                     *"
echo 関係者:   /dev/nvme0n1p2 (for root, ext4) - remaining space                  *"
echo "* *"
echo "* The 'raspi-config' step for setting the boot order MUST be done      *"
echo "* MANUALLY after this script completes.                                *"
echo "************************************************************************"
echo ""

read -p "Have you manually partitioned /dev/nvme0n1 as per the instructions above (y/N)? " -n 1 -r
echo
if [[ ! $REPLY =~ ^[Yy]$ ]]; then
    echo "Aborting. Please partition /dev/nvme0n1 manually first using fdisk."
    exit 1
fi

# Define devices
NVME_DEVICE="/dev/nvme0n1"
SD_BOOT_PART="/dev/mmcblk0p1"
SD_ROOT_PART="/dev/mmcblk0p2"
NVME_BOOT_PART="${NVME_DEVICE}p1"
NVME_ROOT_PART="${NVME_DEVICE}p2"

# Define temporary mount points
MOUNT_DIR="/mnt/migration"
SD_BOOT_MOUNT="${MOUNT_DIR}/sd_boot"
SD_ROOT_MOUNT="${MOUNT_DIR}/sd_root"
NVME_BOOT_MOUNT="${MOUNT_DIR}/nvme_boot"
NVME_ROOT_MOUNT="${MOUNT_DIR}/nvme_root"

echo "Starting OS migration from SD card to NVMe SSD..."

# Function to clean up mounts in case of error or successful completion
cleanup_mounts() {
    echo "Attempting to unmount partitions and clean up..."
    sudo umount "$NVME_BOOT_MOUNT" 2>/dev/null
    sudo umount "$NVME_ROOT_MOUNT" 2>/dev/null
    sudo umount "$SD_BOOT_MOUNT" 2>/dev/null
    sudo umount "$SD_ROOT_MOUNT" 2>/dev/null
    sudo rm -rf "$MOUNT_DIR"
    echo "Cleanup complete."
}

# 1. Format the new partitions
echo "1. Formatting NVMe partitions..."
sudo mkfs.vfat -F 32 "$NVME_BOOT_PART" || { echo "Error formatting NVMe boot partition."; cleanup_mounts; exit 1; }
sudo mkfs.ext4 "$NVME_ROOT_PART" || { echo "Error formatting NVMe root partition."; cleanup_mounts; exit 1; }
echo "NVMe partitions formatted."

# 2. Create mount points
echo "2. Creating temporary mount points..."
sudo mkdir -p "$SD_BOOT_MOUNT" "$SD_ROOT_MOUNT" "$NVME_BOOT_MOUNT" "$NVME_ROOT_MOUNT" || { echo "Error creating mount points."; cleanup_mounts; exit 1; }
echo "Mount points created."

# 3. Mount the partitions
echo "3. Mounting partitions..."
sudo mount "$SD_BOOT_PART" "$SD_BOOT_MOUNT" || { echo "Error mounting SD boot partition."; cleanup_mounts; exit 1; }
sudo mount "$SD_ROOT_PART" "$SD_ROOT_MOUNT" || { echo "Error mounting SD root partition."; cleanup_mounts; exit 1; }
sudo mount "$NVME_BOOT_PART" "$NVME_BOOT_MOUNT" || { echo "Error mounting NVMe boot partition."; cleanup_mounts; exit 1; }
sudo mount "$NVME_ROOT_PART" "$NVME_ROOT_MOUNT" || { echo "Error mounting NVMe root partition."; cleanup_mounts; exit 1; }
echo "Partitions mounted."

# 4. Copy the data
echo "4. Copying boot partition from SD to NVMe..."
sudo rsync -ah --progress "${SD_BOOT_MOUNT}/" "${NVME_BOOT_MOUNT}/" || { echo "Error copying boot partition."; cleanup_mounts; exit 1; }

echo "4. Copying root partition from SD to NVMe. This will take a while..."
# Exclude commonly volatile directories and the mount points themselves
sudo rsync -ah --progress --exclude=/dev --exclude=/proc --exclude=/sys --exclude=/tmp --exclude=/run --exclude=/mnt --exclude=/lost+found "${SD_ROOT_MOUNT}/" "${NVME_ROOT_MOUNT}/" || { echo "Error copying root partition."; cleanup_mounts; exit 1; }
echo "Data copied."

# 5. Update fstab on the NVMe SSD
echo "5. Updating fstab on the NVMe SSD..."

# Get UUIDs of the new NVMe partitions
NVME_BOOT_UUID=$(sudo blkid -s UUID -o value "$NVME_BOOT_PART")
NVME_ROOT_UUID=$(sudo blkid -s UUID -o value "$NVME_ROOT_PART")

if [ -z "$NVME_BOOT_UUID" ] || [ -z "$NVME_ROOT_UUID" ]; then
    echo "Error: Could not get UUIDs for NVMe partitions. Aborting fstab update."
    cleanup_mounts
    exit 1
fi

# Create a new fstab for the NVMe root partition based on its UUIDs
cat << EOF | sudo tee "${NVME_ROOT_MOUNT}/etc/fstab"
# A root partition is required on every installation.
UUID=${NVME_ROOT_UUID}  /       ext4    defaults,noatime  0       1
# A boot partition is required on every installation.
UUID=${NVME_BOOT_UUID}  /boot/firmware  vfat    defaults,noatime  0       2
EOF

echo "fstab updated successfully on NVMe SSD."

# 6. Unmount the partitions and clean up
cleanup_mounts

echo ""
echo "------------------------------------------------------------------------"
echo "OS copy to NVMe SSD is complete!"
echo "NEXT STEPS (MANUAL AND CRITICAL):"
echo "1. Reboot your Raspberry Pi (it will still boot from the SD card):"
echo "   sudo reboot"
echo "2. Once rebooted, log back in and run 'sudo raspi-config'."
echo "3. Navigate to '3 Boot Options' -> 'B1 Boot Order' -> 'B2 NVMe/USB Boot'."
echo "   Select this option to set the NVMe/USB boot priority."
echo "4. Exit raspi-config. It will ask to reboot, choose 'Yes'."
echo "5. As soon as the Pi powers down, PHYSICALLY PULL OUT THE SD CARD."
echo "6. Power on your Raspberry Pi. It should now boot from the NVMe SSD."
echo ""
echo "After booting, verify with 'lsblk -o NAME,FSTYPE,SIZE,MOUNTPOINT,LABEL'"
echo "that nvme0n1p2 is mounted at / and nvme0n1p1 at /boot/firmware."
echo "------------------------------------------------------------------------"Code language: PHP (php)
For me, the work was manual and I did not actually test the above. But looking though the commands in the script, it seems that it did quite a fine work!
More: