
As my adventure with using Linux goes on and on, I am learning about advantages and disadvantages of distributions, desktop environments and window managers. Mainly for curiosity and for getting my hands dirty, I have decided to try Debian - first as a desktop solution. I am hoping to deepen my knowledge in an empirical way.
I have installed the usual development required apps: VS Code, docker. Together with this, I have added Chromium, the Brave browser, balenaEtcher, VLC media player, Steam.
Don't break Debian
Debian is a robust system, as long as you have the proper habits and use it "in the debian way". A small summary of the most important rules for beginners:
- Pay attention at installing, but even more at removing software;
- Install software from Debian repositories, do not use Ubuntu packages or repositories, as not all of them are compatible;
- Be careful at the commands you execute on your system, try to understand what they will do before running them. This includes running entire scripts directly from the web;
More information:
- https://wiki.debian.org/DontBreakDebian
- https://www.youtube.com/watch?v=ROLg2mi6Ng8
- https://www.youtube.com/watch?v=aO8BuQITnRw
zsh
Some of the programmers - probably most of them actually - spend a lot of time in the shell. Therefore, it is important to have one as nice as possible and zsh provides a good solution. To install it:
sudo apt install zsh
You can immediately start using the new shell by typing zsh. When starting the first time, you will be prompted to create the usual files it needs - creating an empty file should do the trick. Some other changes are necessary to start it by default and related to this, my recommendation is just to update your terminal's emulator profile.
You can use it in combination with antigen, which is a plugin manager for zsh:
mkdir ~/.antigen/ && cd ~/.antigencurl -L git.io/antigen > antigen.zsh
(Remember the3rdrule about preserving debian)nano ~/.zshrcand load antigen, together with your configuration
An example configuration, straight from the project's repository is:
source ~/.antigen/antigen.zsh

# Load the oh-my-zsh's library.
antigen use oh-my-zsh

# Bundles from the default repo (robbyrussell's oh-my-zsh).
antigen bundle git
antigen bundle heroku
antigen bundle pip
antigen bundle lein
antigen bundle command-not-found

# Syntax highlighting bundle.
antigen bundle zsh-users/zsh-syntax-highlighting

# Load the theme.
antigen theme robbyrussell

# Tell Antigen that you're done.
antigen apply
I personally like bira or ys as theme. And other bundles I use:
antigen bundle zsh-users/zsh-autosuggestions
antigen bundle zsh-users/zsh-completions
Should you have special commands you run with your shell, you should add them in .zshrc as well. A good idea might be to extract them to a common file, e.g. ~/.profile.
More information:
- https://www.howtogeek.com/362409/what-is-zsh-and-why-should-you-use-it-instead-of-bash/
- https://github.com/zsh-users/antigen
Setup openssh
You might want to connect remotely to your machine, via SSH. In order to do that, you might need to install OpenSSH, which can be done with the following command:
sudo apt-get install openssh-server
Read more: https://linuxhint.com/enable-ssh-server-debian/
PHP and composer
sudo apt install wget php-cli php-zip unzipphp -vphp -r "copy('https://getcomposer.org/installer', 'composer-setup.php');"HASH="$(wget -q -O - https://composer.github.io/installer.sig)"php -r "if (hash_file('SHA384', 'composer-setup.php') === '$HASH') { echo 'Installer verified'; } else { echo 'Installer corrupt'; unlink('composer-setup.php'); } echo PHP_EOL;"composer -v
Read more:
- https://thishosting.rocks/install-php-on-ubuntu/
- https://linuxize.com/post/how-to-install-and-use-composer-on-ubuntu-18-04/
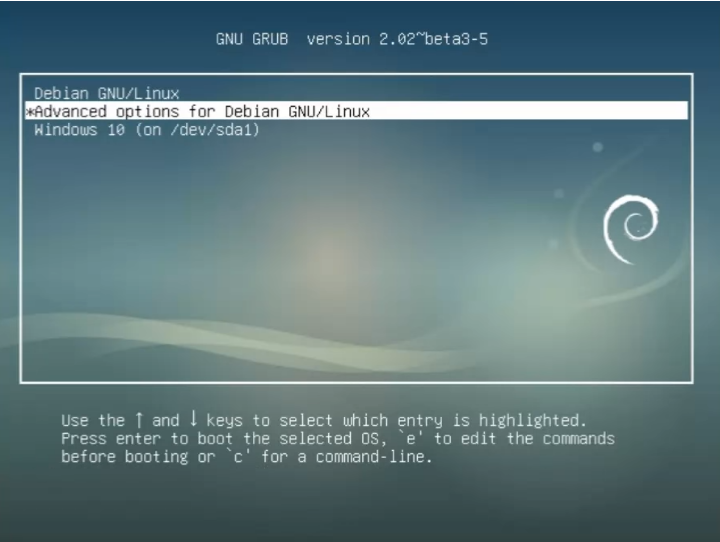
The boot loader
By default, Debian uses GNU GRUB as a boot loader. With the initial look it is not the nicest possible. I think you can change it to something else, but I wouldn't do that, especially as a beginner.
New themes
The default theme of the boot loader - GNU GRUB - can be improved by using a custom theme. The commands to prepare for using the new theme:
sudo apt install grub-customizer -ycd /usr/share/grub && ls -lasudo cp /boot/grub/grub.cfg /usr/share/grub/grub.theme-bak.cfg- make a backup of your current grub configuration file, in case you break any of the options later;mkdir -p /usr/share/grub/themes- this command will create the themes directory, in case it does not exist and it will do it as root, preserving the ownership inside the folder;sudo chown $(whoami):$(whoami) /usr/share/grub/themes- this will change the owner of the themes folder, which will allow you to use the file manager to copy themes without elevated privileges.
To keep things easy and friendly, we will now move to move away from the command line and do rather visual activities:
- The first thing to do is to pick the theme we want to install. Using a rather famous website for themes, what I liked was: https://www.gnome-look.org/p/1230780/
- Download the theme and copy the new file to
/usr/share/grub/themes - Open the previously installed
Grub Customizer, go toAppearance settings, check and modify the custom resolution to1920x1080and inThemeselect the folder of the new theme. - Hit save - ! be cautious not to ignore any message or error which might have been previously displayed ! - and restart to see the new theme in action.
More information:
Hide the bootloader
An easy solution, which was my choice in the end, is to hide the bootloader:
sudo cp /etc/default/grub /etc/default/grub.backupsudo nano /etc/default/grub- Update the following variables, as shown:
GRUB_HIDDEN_TIMEOUT="0"GRUB_TIMEOUT="0"
sudo update-grub- Restart your computer to see the changes.
More information:
- https://www.howtogeek.com/196655/how-to-configure-the-grub2-boot-loaders-settings/
- https://linoxide.com/linux-how-to/hide-grub-boot-linux/
KDE Plasma to the rescue
KDE Plasma is supposed to be the most configurable desktop environment for Linux. I found a lot of customization options indeed, maybe even more than I found it comfortable.
In the following lines I will point out some ideas about how I have prepared it.
Applications
Probably the list of applications can improve, as most of the apps I picked some are some of the first search results in DuckDuckGo which also looked good in pictures or video.
So, here they are:
Yakuake- a terminal application which slides down from the top of your current desktop;UMenu- a widget with a simple menu;Flameshot- this application is used to create screenshots, an alternative toSpectaclewhich comes preinstalled and it is quite nice, actually;htop- useful for viewing the current system resources availability;neofetch- nice cli display of your system's information;cmatrix- make your terminal look matrix like;dmidecode- get information about your system (e.g.sudo dmidecode -t memory);timeshift- automatic backups.
Some ideas for other applications can be found here:
https://github.com/luong-komorebi/Awesome-Linux-Software
Themes
I was not too adventurous about the theme. I have used Breeze Dark as the main theme, Breeze for the splash screen, Plastik for the window decorations and Breeze Noir Dark or Monochrome for the Login manager.
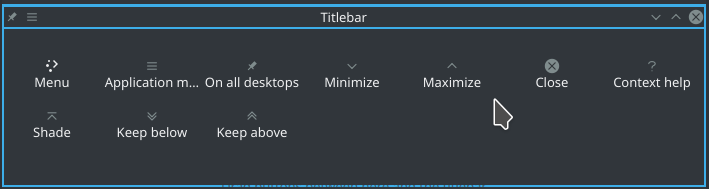
Menus and titlebar
I do not have an application menu bar. I like having as much space as possible on the work area.
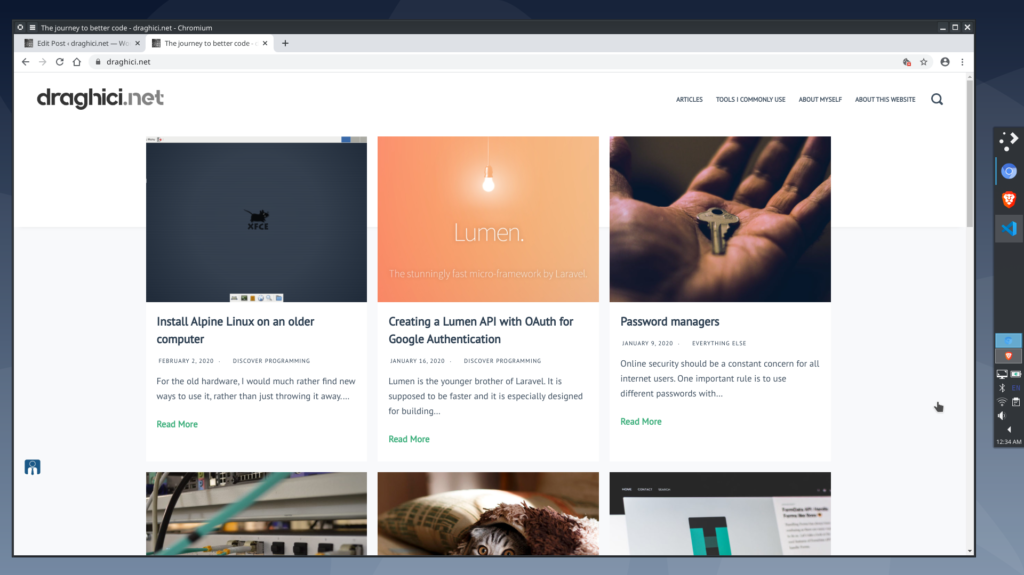
Option 1 - A panel to the right

As I already mentioned, I like to keep things on my screen to a bare minimum - this helps me concentrate on the task at hand.
In the workflow I prefer using, I have just one panel on the right side which I try to keep as simple as possible. Depending on how many apps I am using at the same time in a virtual desktop, I change its height from time to time.
If you are using multiple screens and you want the panel on all of them, you can just create one for each. (So far, I could not find an option to put the panel on all the screens, which is not actually too problematic)
The widgets inside this panel are:
- Application launcher;
- Task manager;
- Pager;
- System tray.
As I am using a scroll wheel mouse, I find it rather easy to switch between the applications (Task manager), the desktop (Pager) just by scrolling above it.
For now, I am also using just 2 desktops:
- The first is for the working and it contains the editor, a browser with the preview of what I am working on etc;
- The second is for entertainment.
Important note: if you have multiple displays, the default behavior is to switch to the next virtual desktop on all of them. I think this is different from other operating systems and it is worth a try, as part of the whole experience.
Another note is that I am not quite comfortable or even familiar with what this distribution has to offer (e.g. Activities), so this workflows might suffer important changes in time.
Option 2 - The Latte dock
In the setup above, there is no need for a dock, as the main panel itself is a kind of a dock. However, should you need something in that direction, latte is the most famous dock out there and it does a pretty nice job. To install it, run:
sudo apt install latte-dock
I find it useful pinned to the side of the display, with transparency and containing just a task manager widget. This widget would discretely show only the apps started on that screen, in the current desktop.
More information:
Option 3 - The winner combination
This is a later edit of the article, after using the above variations more. Below I am only describing the most important parts of the customization, out of which the workflow can be recreated.
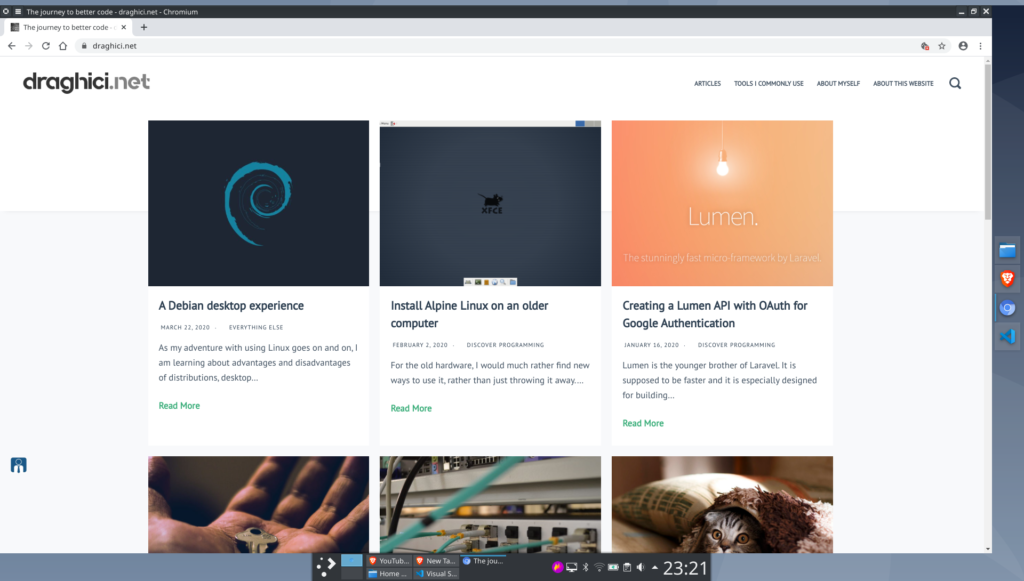
The panel
So I ended up using a bar on the bottom, with no other panel. It is stretched on the whole width of the desktop. The widgets are the following:
- The default application launcher
- UMenu - a clean way to see all the apps. I have it there because I am used to seeing the applications in this manner, but I actually use the KDE launcher a lot (
Alt + Space); - Pager - to easily switch between the configured virtual desktops. I have two desktops, one where I do all the work and another which is supposed to help whenever I have extra stuff to check or do. I use the latter lightly, so I might remove it in the future;
- The task manager - set to show all the tasks from the current desktop and the current activity. It has manual sorting and a 1 row maximum;
- The system tray - as an important extra to mention, it always shows the Display configuration and Flameshot, the program I use for creating screenshots;
- System load viewer - it has CPU, Memory and Swap monitor visible. This is quite useful, as it shows me when to slow down in the actions I do, so that I will be in sync with the capabilities of my system;
- The clock;
- Lock/Logout widget - with Leave, Lock and Hibernate activated;

The task switcher
I ended up using the task switcher quite a lot, so it was important to have it customized in a way I found comfortable. The solution was a a custom visualization (Thumbnail grid) with two variants of usage:
Meta+Tabto switch forward between windows - this is the combination I use the most and it is for switching between tasks in the current Activity, the current Virtual desktop and the Current screen;Alt+Tab- same as the above, but without thecurrent screenfilter;
Keyboard shortcuts
The following keyboard shortcuts are the most important:
Meta+TabandAlt+Tabwhich do the switching between tasks as described above;Alt+Space- KDE default for the application launcher;Menu- I use the menu key to walk though the Activities. For now, my way of working with activities was to separate them on a team basis.
Awesome - the bare window manager
With my 100% rookie quest in the linux world, I discovered notions like desktop environment and window manager. For the window manager part, there are a lot out there, but I will only try Awesome for now, as it is the one indicated on the Debian wiki:
https://wiki.debian.org/Awesome
Other window managers: i3, Openbox, Qtile. More information on window managers can be found here:
https://www.youtube.com/watch?v=Obzf9ppODJU
Steps to install
sudo apt-get install awesomesudo apt-get install awesome-extrasudo nano /usr/share/xsessions/awesome.desktopand make sure the following is set insideNoDisplay=false
Initial commands
The following section is mostly copied from the wiki, mainly because it's the starting point for using the window manager itself. man awesome will provide more info.
win+enter- open terminals;win+l-win+hto enlarge or shrink windows;win+j- go to the next window;win+r- get a command for starting programs, the command line showing "Run:" appears in the menu line just right of the tags section;win+shift+q- quitting Awesome;win+ctrl+r- a restart of Awesome.
Troubleshooting for Debian
Connecting a Bluetooth speaker
I have used the following solution for solving the connection issues to the bluetooth speaker:
sudo apt install pulseaudio-module-bluetoothpulseaudio -kpulseaudio --start
Disconnecting the display set as primary
I have Debian setup on my laptop, which I often use with an external display. As a workflow, regardless of the OS, I use the external display as a primary and do most of the work there. However, if you disconnect the external one you might end up with an empty desktop on your laptop screen.
A general and accidental fix for myself was described above and it's about having the same panel on all the screens, which includes the Display configuration widget.
The "more serious" fix came in combination with the Yakuake terminal, which opens in the active desktop on a key combination. The command used was simply, without any arguments: xrandr
xrandr is a command-line tool which - among other things - offers the reconfiguration of the X server without restarting it. It might even be preinstalled on your system.
More information:
- https://xorg-team.pages.debian.net/xorg/howto/use-xrandr.html
- https://superuser.com/questions/1131179/how-to-install-and-use-xrandr-in-debian#1131240
Using a 4K display
Scaling is still problematic on KDE, so using this solution will help. Edit ~/.profile and add export PLASMA_USE_QT_SCALING=1.
- https://forum.manjaro.org/t/scaling-4k-monitor-on-kde/52984/5
- https://www.reddit.com/r/kde/comments/85rz91/icons_in_the_desktop_context_menu_dont_respect/
- https://www.youtube.com/watch?v=bhIX_Qcn4jY
Failed to start Raise network interfaces
When starting the computer, I kept noticing this error: Failed to start Raise network interfaces. Since nobody likes a small error showing up among many other successful steps, I spent some time trying to figure it out, and the following worked:
- edit
/etc/network/interfaces.d/setup - replace
auto eth0withallow-hotplug eth0
initramfs unpacking failed: decoding failed
When starting, you might see this message on your screen. The following steps could do the trick in fixing it:
sudo nano /etc/initramfs-tools/initramfs.conf- change
COMPRESS=lz4toCOMPRESS=gzip sudo update-initramfs -u
https://forums.linuxmint.com/viewtopic.php?p=1836169&sid=fb0f86298ca37ba1c4a674d6d191c991#p1836169
SGX disabled by bios
The message "SGX disabled by bios" might appear on your screen as the OS boots. The solution is to add nosgx as a boot flag.
Source:
https://bbs.archlinux.org/viewtopic.php?id=269249
Zsh and snap application
If you use snap and swtich from bash to zsh (I did it by editing /etc/passwd), you might notice that the applications do not show up in the laucher. The fix was:
sudo nano /etc/zsh/zprofile- append:
emulate sh -c 'source /etc/profile'
Source:
https://chrisrmiller.com/2019/07/23/zsh-and-snaps-integration-for-kde-and-others/
General impressions
I think Ubuntu with its Gnome default was more comfortable to get into. Maybe it was just my feeling, but it seemed that connecting the external monitor was easier, connecting Bluetooth devices was also easier.
I would like to stick with Debian, especially for getting familiar with it: how packages are handled, updates, the ecosystem. For now, I intend to make it my operating system of choice when it comes to servers.
Nice information sources
But, I look forward to trying Manjaro, the baby and friendly brother of Arch. And further, as I get more experience, I'd like to try a bare window manager, like i3.