
We will use Typescript, Vue 3, vite, pinia, cypress and other fancy things to create an app which will consume the TVmaze API to display movie information.
We will use an open TV shows API http://www.tvmaze.com/api to create an application that allows users to view a few lists (preferable horizontal list) of TV shows based on different genres (drama, comedy, sports, etc.).
The goal is to display a few popular TV shows based on their rating and genre on a dashboard and when the user clicks on a TV show then the details of that TV show should be displayed on another screen. Also, the user should be able to search for a TV show to get the details.
As a general deadline, around 3 days should be the goal for all the work in this article. I will try to fit into this deadline as many features from the above request as possible.
The code for this project is available at:
https://github.com/cristidraghici/tvmaze-vue/tree/implement-requirements
Notes on the API
- This was not the most developer friendly API I have worked with. For example, it would have been nice to receive the same number of items on each request. Or it would have been nice to have some metadata which would minimally say if there are more items to be retrieved;
- The API does not seem to have querying based on Genre, so we will have to work something out to deliver that.
The URL for the API is:
I have used jsonlint to see the actual responses in a friendlier way. It's quite an accesible tool that I have used for years.
Initial decisions
- We will use `fetch` to make the requests to the TVmaze API, as they will all be GET requests. We will remember to implement mechanisms to prevent abusing the API;
- We will handle styling with Quasar, as it supports Vue 3 and vite;
- We will use `vue-router` to navigate between the dashboard, search (will be separate pages or two views inside the same page) and details views;
- We will use `pinia` to store the global state, which will be shared between the list pages and the details page;
- We will start by showing normal lists and at the end create a special component which will make horizontal lists.
General ideas
- We will use git for versioning our code, but we will not have a remote (e.g. Github, Bitbucket etc.) setup from the beginning;
- In a real project, we would not commit anything to `master` except the initial boilerplate code. However, we will fix errors and make minimal changes, as we want to keep the number of branches to a minimum. For the same reason, we will only create only one feature branch;
- We will make imperative commits and try to be as concise as possible. Ideally, each commit in the feature branch will provide a solution to a clear requirement.
Bootstrapping the application
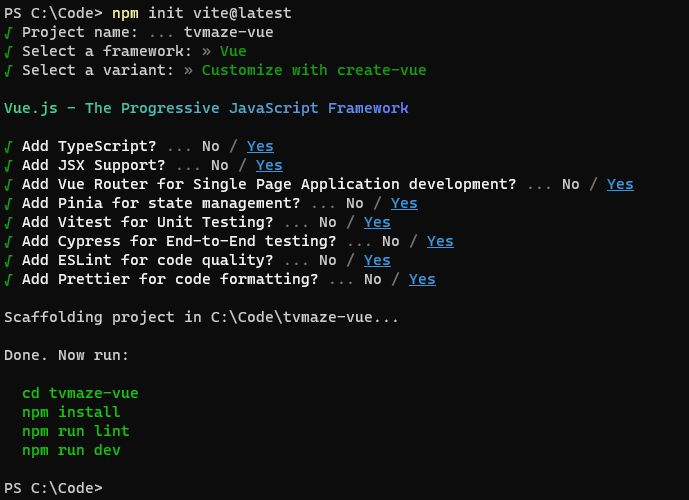
We already know we want to use Vue 3 and vite. To setup the project we will start from vite and say that we want a vue project with create-vue customization, which offers more options to select from. We should remember to init a git repository, if
This will generate the basic setup with vite and vue:
npm init vite@latest- Go into the folder of your project (
tvmaze-vuein our example) git inityarn install
The next step will be to add an initial .editorconfig file:
root = true

[*]
charset = utf-8
indent_style = space
indent_size = 2
end_of_line = lf
insert_final_newline = true
trim_trailing_whitespace = true
quote_type = single

[*.md]
max_line_length = 0
trim_trailing_whitespace = false

[COMMIT_EDITMSG]
max_line_length = 0Code language: JavaScript (javascript)
Once the above is in place, make the first commit to ensure a clean version history for your application:
git add .git commit -m "First commit"
If chosen the typescript version, one issue I encountered was that TS complained that defineProps was not defined ("Cannot find name defineProps"). The fix was adding another package:
yarn add --dev @vue/runtime-dom
Another issue I encountered was that running yarn lint changed the content in a quite undesirable form. The main fix was to set a proper value for htmlWhitespaceSensitivity, thus update .prettierrc.json's content to:
{
  "endOfLine": "lf",
  "semi": false,
  "tabWidth": 2,
  "singleQuote": true,
  "printWidth": 100,
  "trailingComma": "none",
  "htmlWhitespaceSensitivity": "ignore"
}Code language: JSON / JSON with Comments (json)
Read more:
- https://learnvue.co/tutorials/intro-to-vue-3
- https://michael-verschoof.medium.com/creating-a-vue-3-and-typescript-project-using-vite-ce312a746fc4
- https://github.com/antfu/unplugin-vue2-script-setup/issues/102
- https://prettier.io/docs/en/options.html
Make the first requests
To create the types to map the response from TVmaze API, we will use an already existing project found at:
https://github.com/JohnDeved/node-tvmaze-api-ts
We will start with a cleanup, removing most of the existing components. We will then create a basic file structure which will mainly have a dashboard to make a request for a list of movies and a details page which will show the value of the passed param.
The next step will be to make some requests and get some data from TVmaze. Again, we are using `fetch` instead of `axios` because the requests are pretty simple and straightforward.
A possible improvement can be to cancel an ongoing request if navigating away from the page which is doing the request.
Read more:
- https://vuejs.org/api/sfc-script-setup.html
- https://youtu.be/-BYZAO99UVA
- https://codemag.com/Article/2011091/The-Complete-Guide-to-Suspense-in-Vue3
A custom hook
We can also wrap our requests in a custom hook:
import { ref } from 'vue'

export const useFetch = <T>(fn: Function) => {
  const response = ref<T | null>(null)
  const error = ref<Error | null>(null)
  const loading = ref(false)

  const fetch = async () => {
    loading.value = true
    try {
      response.value = await fn()
    } catch (e) {
      const err = e as Error
      error.value = err
    } finally {
      loading.value = false
    }

    return response.value as T
  }

  fetch()

  return {
    response,
    error,
    loading,
    fetch
  }
}Code language: PHP (php)
An example request is:
const { response } = useFetch<Show>(() => getShow(id))

watch(response, () => {
  show.value = response.value
})Code language: JavaScript (javascript)
As you can see, the tricky part with this implementation is the reactivity for the deconstructed values. This is one of the reasons why I gave up on this implementation for now.
Style the files
In the past I have used vuetify and I was rather comfortable with it. However, at the time o this article, vuetify did not have a stable release for Vue 3. Therefore, I thought that Quasar is a close enough solution as options and features, especially its support for Vue 3 and vite. We will redesign the existing pages and try to provide some flow to the whole application.
However, the main focus of this project will not be on the looks, nor on showing as much information as possible. As long as the information comes and it's easy to access, then CSS and templating is something rather easy to do.
Commands:
yarn add quasar @quasar/extrasyarn add -D @quasar/vite-plugin sass@1.32.12
Debouncing
Apparently, inputs in quasar have their own debouncing solution for inputs we do not need our custom util anymore:
export default function debounce<T>(fn: T, wait: number) {
  let timer: ReturnType<typeof setTimeout>

  return (event: Event) => {
    if (timer) clearTimeout(timer)

    timer = setTimeout(() => {
      if (typeof fn === 'function') {
        fn(event)
      }
    }, wait)
  }
}Code language: JavaScript (javascript)
An example call would be:
const onSearchInputChange = debounce(async (e: Event) => {
  const target = e.target as HTMLInputElement
  search.value = target.value

  // ... or we can enjoy the reactivity and put the request on a watcher
  if (search.value.length > 0) {
    try {
      searchResults.value = await getSearchShows(search.value)
    } catch (e) {
      const err = e as Error
      console.error(err.message)
    }
  } else {
    searchResults.value = []
  }
}, 500)Code language: JavaScript (javascript)
Structure the application
At this point we are able to access the API, but we are doing it in a rudimentary way and we show minimal data. It's time to start using pinia to manage our state.
The main reason to store the movie list outside the dashboard view is that we want the already loaded results available.
For a similar reason, we will create a separate store for the search. Since we want to keep the application small and simple, we will treat the search results as separate from those from the paginated results. As a new feature or an improvement, they could be put in the same store and then filtered out based on id.
We will not use a store for the show details requests, as we don't really need all that information elsewhere. However, in the show details page we will use the store to try to display the name of the show while loading.
To help with designing the pages, a delay to the API responses has been applied directly in the `@/api/` request files:
// Delay the response by 1 second
await new Promise((resolve) => {
  setTimeout(() => {
    resolve('')
  }, 1000)
})Code language: JavaScript (javascript)
The above can also be slightly tweaked to check what happens when an error on the API occurs.
const isSuccessful = (): boolean => Math.random() >= 0.5

await new Promise((resolve, reject) => {
  setTimeout(() => {
    isSuccessful() ? resolve('') : reject({ message: 'Error encountered! Beware!' })
  }, 1000)
})Code language: JavaScript (javascript)
We will also be organizing the views. Basically, each view will receive a cleanup and we will create sub-components where necessary. If the sub-components are common for multiple views, then they will be moved to the `./src/components` folder. As much as possible, the common components will be kept as dumb 🙂 and isolated from the global state as possible.
A custom hook has been created to show notifications. Currently, we only need a notification to show errors. By using a hook wrapped around the notifications, we will ensure that the same type of notifications will look the same way everywhere in the app.
One thing I found weird is that if you create a store, you import it in your component and you destructure its properties and use them in the template, they are not reactive. However, if you use the store directly, then they are. I have a suspicion about why this happens, but I need to look into this 😅for a certain explanation. Meanwhile, I think it's a nice hint for somebody who starts with the Composition API of Vue.
Learn more:
- https://youtu.be/Elv97p2jXK8
- https://youtu.be/XdRcFsoJAWQ
- https://youtu.be/JGC7aAC-3y8
- https://vuejs.org/api/sfc-script-setup.html
Improve test coverage
At this point, the application is stable enough to tackle the testing aspect. We will improve on unit testing and maybe add some basic cypress tests.
Testing with Quasar and vitest has proven more challenging than expected. Some minimal tests have been added, but this is a matter to be improved for sure.
More information
- https://vitest.dev/guide/mocking.html
- https://stackoverflow.com/questions/72147018/vitest-test-await-async-completion-of-onmounted-callback-in-vue3-component
- https://itnext.io/stubbing-vue-components-in-vue-test-utils-6e9442e094c3
Implement the horizontal slider
In a perfect world, I would have had more time to create a special slider. In the frontend world, with the modern frontend libraries, the sky's the limit as to what you can do.
Maybe a horizontal slider in Vue 3 is a good idea for a new article, on its own.
A css solution
However, because of the other unexpected issues I have encountered, the solution for the horizontal slider is a rudimentary and unreliable CSS one:
// Add the following for a CSS based rudimentary horizontal scrolling solution on mobile
  &--horizontal {
    ul {
      display: flex;
      max-height: 320px;
      overflow-x: auto;

      li {
        line-height: 320px;
      }
    }

    &--isMobile {
      ul::-webkit-scrollbar {
        width: 0;
      }
    }
  }Code language: JavaScript (javascript)
A basic JS/TS solution
A quick solution could be to implement a different way of showing the list in the `ShowsList.vue` component. However, this solution is not quite the clean one, so it will not make it in the codebase as it is:
<script setup lang="ts">
import { ref, computed } from 'vue'

import PosterImage from '@/components/PosterImage.vue'
import CircularLoader from '@/components/CircularLoader.vue'
import type { Show } from '@/api/types'

const props = withDefaults(
  defineProps<{
    title: string
    noResultsText: string

    windowWidth: number
    posterWidth: number
    shows: Show[]

    canLoadMore?: boolean
    isLoading?: boolean
  }>(),
  {
    windowWidth: 1,
    posterWidth: 1,

    canLoadMore: false,
    isLoading: false
  }
)

const itemsPerPage = computed(() => {
  // Get the window width, but subtract the width of the buttons
  // and some buffer for the padding of the content

  /**
   * We will use the passed window width, but we will consider some extra
   * 50px on each side for the buttons and 40px as a general space around
   * our element.
   */
  const windowWidth = props.windowWidth - 100 - 40

  /**
   * We will use the passed poster width, but we will add the 10px set as
   * margin internally, in the css of this component.
   */
  const posterWidth = props.posterWidth + 10

  return Math.floor(windowWidth / posterWidth) || 1
})
const currentItem = ref<number>(0)

const totalShows = computed(() => props.shows.length)

const hasMoreLeft = computed(() => currentItem.value > 0)
const hasMoreRight = computed(
  () => props.canLoadMore || currentItem.value + itemsPerPage.value > totalShows.value
)

const paginatedShows = computed(() => {
  return props.shows.slice(currentItem.value, currentItem.value + itemsPerPage.value)
})

const setOffset = (offset: number) => {
  if (offset < 0) {
    return
  }
  if (offset > totalShows.value) {
    return
  }

  currentItem.value = offset
}
</script>

<template>
  <div class="ShowsCarouselByGenre">
    <h1 class="text-h4">{{ title }}</h1>

    <div class="ShowsCarouselByGenre__Shows">
      <div class="ShowsCarouselByGenre__Shows__Navigation">
        <div
          class="ShowsCarouselByGenre__Shows__Navigation__GoLeft"
          :class="{ 'ShowsCarouselByGenre__Shows__Navigation__GoLeft--disabled': !hasMoreLeft }"
          @click.stop="setOffset(currentItem - itemsPerPage)"
        >
          <q-icon name="arrow_back" size="xl" />
        </div>
      </div>

      <div class="ShowsCarouselByGenre__Shows__Items">
        <div v-for="show in paginatedShows" :key="show.id" :itemHeight="290" :itemWidth="210">
          <RouterLink :to="`/show/${show.id}`">
            <transition name="slide" :duration="500" appear>
              <PosterImage :src="show.image?.medium" :name="show.name" />
            </transition>
          </RouterLink>
        </div>
      </div>

      <div class="ShowsCarouselByGenre__Shows__Navigation">
        <div
          class="ShowsCarouselByGenre__Shows__Navigation__GoRight"
          :class="{
            'ShowsCarouselByGenre__Shows__Navigation__GoRight--disabled':
              !hasMoreRight && !canLoadMore
          }"
        >
          <q-icon
            v-if="!isLoading"
            name="arrow_forward"
            size="xl"
            @click.stop="
              () => {
                setOffset(currentItem + itemsPerPage)

                if (canLoadMore && currentItem + itemsPerPage * 2 > totalShows) {
                  $emit('load-more')
                }
              }
            "
          />
          <CircularLoader color="#000" v-else />
        </div>
      </div>
    </div>
  </div>
</template>

<style lang="scss" scoped>
.ShowsCarouselByGenre {
  &__Shows {
    display: flex;
    flex-direction: row;

    &__Navigation {
      display: flex;
      justify-content: center;
      align-items: center;

      &__GoLeft,
      &__GoRight {
        width: 50px;
        cursor: pointer;

        &--disabled {
          pointer-events: none;
          opacity: 0.4;
        }
      }
    }

    &__Items {
      display: flex;
      flex-direction: row;

      & > * {
        box-sizing: border-box;
        margin: 0px 10px 10px 0px;
      }
    }
  }
}
</style>
Code language: HTML, XML (xml)
More info:
General improvements
The solution delivered in the initially set amount of time has covered all the requirements, but some of them in a very basic manner. One which needed big improvements was the horizontal shows carousel. For that, I have decided to only set the height and width of the poster in a configuration file, not use slots for now and try to reuse as much of the existing codebase as possible.
The new component will receive the list with all the available and matching shows (we have filtering by genre) and will manage pagination on its own. This provides for an easy solution, which can be improved upon if needed.
The ShowsList component has also received some cleanup: more default props, customizable load more text and an animation for the posters displayed.
For a better code structure, the listener watching the window width has been moved to its own custom hook. If we will need the height in the future, then we can easily add it later and return it from the hook as a ref.
A downside for the implementation above is that the genres for the shows were hardcoded. So applying a suggestion received, it was easy enough to create a compute to show all the genres.
Lazy loading the images
Lazy loading a resource means that it will be loaded in your application only at the time when it is needed. In our case, we should pay attention that the images we want to see are to be loaded only when they are in view, instead of when the page is loaded.
The previous CSS based implementation would have required such a technique, since all 250-ish results of the requests were displayed on the webpage.
However, the current one does not require lazy loading images: they are not so many, they are also rather small as size. Implementing lazy loading will surely be a nice exercise. However, we must pay attention at not over-engineering the solutions we provide.
- https://css-tricks.com/lazy-loading-images-with-vue-js-directives-and-intersection-observer/
- https://css-tricks.com/the-complete-guide-to-lazy-loading-images/
Custom hook for localStorage
Since the results lists will not change too often, we could implement some cache based on localStorage, maybe just for the fun of the implementation in Vue3 with typescript.
import { ref, watch, onMounted, onUnmounted } from 'vue'

export const useLocalStorage = <T>(key: string, defaultValue: T) => {
  const value = ref<T>(defaultValue)
  const read = () => {
    const v = window.localStorage.getItem(key)
    if (v != null) {
      value.value = JSON.parse(v)
    }
  }

  read()

  onMounted(() => {
    window.addEventListener('storage', read)
  })
  onUnmounted(() => {
    window.removeEventListener('storage', read)
  })

  const write = () => {
    window.localStorage.setItem(key, JSON.stringify(value.value))
  }
  watch([value], write, { deep: true })

  return value
}
Code language: PHP (php)
Source:
Final thoughts
I have used Windows as a development environment after quite a long time. The OS should not make a big difference, of course. But from time to time, tools like the linter or even project bundlers themselves might have issues because of it.
Since the application is started from scratch and without a clear structure in mind for the files and functionality, it seemed less efficient to write the unit tests with each commit. However, they were kept in mind while developing.
It's the first time I have used Vue's Composition API for a project, so I am getting familiarized with it's options and way of doing things. One thing I have to dig deeper into is the way reactivity actually works. The first impression is that there are many ways to get to the same outcome, so it's necessary to learn more about how it actually works in order to be able to pick the right approach when needed.
Depending on the team decisions, we might want to comment more on the functions and variables than how I chose to do it in this project. I decided to comment only where the solution / the choice made was not the obvious way to go or where the code alone seemed ambiguous.
It's the first time I have used Vue's Composition API for a project, so I am getting familiarized with it's options and way of doing things. One thing I have to dig deeper into is the way reactivity actually works. The first impression is that there are many ways to get to the same outcome, so it's necessary to learn more about how it actually works in order to be able to pick the right approach when needed.
Using Vue 3 for the first time has proven to be more time consuming than initially estimated. This is the main reason why topics such as testing or a proper JS/TS based horizontal slider have not been implemented in the initially set time.
However, it has surely been a captivating experience.