


Many companies offer free plans, so together with AI agents it's pretty accessible to build your own website these days.
Why do it, though? Maybe for the pride of it, maybe for the fun of it, maybe for knowing that you have a single point of truth to the way you present yourself over the internet.
A few years ago I wrote an article here with the basic information one should have about hosting a website. It can still be the base for what we will do today, so here it is for easy access:
Prerequisites
Almost 10 years ago I created a website for a canadian business. Then and for some situations even now, my go to platform for building websites was WordPress. It's one of the most popular tools, it's a mature product powering a big chunk of the internet, it's easy to manage and with some basic sanity rules you can keep the content pretty much clean and organized.
However, this website as many others I worked on have the same content which very rarely changes, have little interaction with the users except for a couple of forms, so there is little need for anything else than a static website solution.
This is why we will use it as the base for our free email hosting and free static website hosting article.
Enter getzmart.ca, a presentation website for a company doing book keeping and payroll services:

Conversion
We will use Gemini for converting the website from WordPress to static. AI tokens are still pretty cheap, so we will not over-engineer a prompt. Also, we will use plan mode.
Make a static version of https://getzmart.ca . Implement functionality for the contact forms using external vendors with a free tier which should be documented in a README.md file. Store the files at the root of the project, inside a folder called: ./src. Add a package.json file at the root with commands to format and print, add husky for precommit hooks, add a vite command for easy preview and a build process. Use package.json to manage the libraries used by the website. Ask me questions one by one for whatever you need to create a clear implementation plan.
After some back and forth in the conversation with the agent, a static version of the website was ready. As a perfectionist programmer, I had to ask for some tweaks around the file names, the file structure, the code content, even had to manually change some things. But the initial result was pretty close to a minimal needed functionality.
So, once we are happy, we can commit the code to a new repository:
git initgit commit -m "First commit"
Hosting for the website
For hosting, we will tackle an extra dimension: hosting the code on a git provider and adding automated jobs for publishing the updated files. In this case we will use Github with Actions for versioning the code and CloudFlare for hosting the files. The domain name is with Godaddy and we will keep the nameservers there.
Domain name
In this article we are tackling the conversion of an existing website. However, should it be a new site, then the first step would be to buy the domain name. For doing that, here are some registrars you might use:
- https://www.cloudflare.com/
- https://www.godaddy.com/
- https://register.domains/en/
- https://rotld.ro/home/
For simplicity in case you decide to host with CloudFlare, with the slight risk of vendor lock-in, you could buy the domain name from CloudFlare or transfer it, if you have already bought it somewhere else.
Nameservers
So, the next step is to create a CloudFlare account or use your existing one, to import the DNS settings. In the main menu, we go to the Domains tab > Overview > Add domain, then pick "Connect a domain" and follow the wizard.
At some point in the wizard, CloudFlare will show the new nameservers you should use with your domain. Once they are shown, we login to the domain name provider admin interface (in our case godaddy) where we will put the new values:
- naya.ns.cloudflare.com
- rudy.ns.cloudflare.com
Be aware that these vary, so do not copy the values above, but pick those indicated by the CloudFlare wizard.
Hosting with CloudFlare
CloudFlare is very-very good at hosting static websites. It is mainly a CDN (Content Delivery Network), which means that it optimizes file delivery across the world, thus increasing the speed of your website dramatically.
There are multiple ways to upload the site. We will use the simplest for now, by uploading the static files to their server:
- In the main menu, go to Build > Compute > Workers and Pages;
- Click "Create Application" and there select "Upload your static files", then use the folder upload to upload your files.
- Once you click "Deploy", the files will be uploaded and a preview link will be generated.
The next step will be to update the DNS settings to point to the CloudFlare Page:
- Go to the domains tab in your new application, click "Add Domain" and try to add the getzmart.ca domain. You will get a message saying that you already have records for this domain which you need to delete first;
- Go to Domains > Overview > getzmart.ca > DNS Records and delete all the A and CNAME records;
- Go back to Build > Compute > Workers & Pages, select your application and try step 1) again.
At this point, the static files should be delivered by CloudFlare.
Github
To avoid manually uploading the new files every time we make changes, we will setup some Github actions to change the static files every time we push a change.
There are certain variations here, one good suggestion being to upload the page only when we tag a release and have some staging or preprod build on push. But we will only have a manual trigger and a trigger for when we push to the main / master branch. This is a very simple project and we expect changes once or twice a year, so for that a simple flow with little maintenance is the better choice.
Let's start with the code for the action, which can be saved in ./.github/workflows/cloudflare-pages.yml:
name: Deploy to Cloudflare Worker

on:
  push:
    branches:
      - main
      - master
  workflow_dispatch:

permissions:
  contents: read
  deployments: write

concurrency:
  group: cloudflare-worker-deploy
  cancel-in-progress: false

env:
  CLOUDFLARE_API_TOKEN: ${{ secrets.CLOUDFLARE_API_TOKEN }}
  CLOUDFLARE_ACCOUNT_ID: ${{ secrets.CLOUDFLARE_ACCOUNT_ID }}
  CLOUDFLARE_PROJECT_NAME: ${{ vars.CLOUDFLARE_PROJECT_NAME }}

jobs:
  deploy:
    runs-on: ubuntu-latest

    steps:
      - name: Checkout
        uses: actions/checkout@v4

      - name: Setup Node.js
        uses: actions/setup-node@v4
        with:
          node-version: 24
          cache: 'npm'

      - name: Install Dependencies
        run: npm ci

      - name: Build Project
        run: npm run build

      # ----------------------------
      # Generate Worker entry file
      # ----------------------------
      - name: Create worker.js
        run: |
          cat > worker.js << 'EOF'
          export default {
            async fetch(request, env) {
              return env.ASSETS.fetch(request);
            }
          };
          EOF

      # ----------------------------
      # Generate wrangler.toml dynamically
      # ----------------------------
      - name: Create wrangler.toml
        run: |
          cat > wrangler.toml << EOF
          name = "${CLOUDFLARE_PROJECT_NAME}"
          main = "worker.js"
          compatibility_date = "2024-01-01"

          [assets]
          directory = "./dist"
          binding = "ASSETS"
          EOF

      # ----------------------------
      # Deploy Worker
      # ----------------------------
      - name: Deploy to Cloudflare
        uses: cloudflare/wrangler-action@v3
        with:
          apiToken: ${{ env.CLOUDFLARE_API_TOKEN }}
          accountId: ${{ env.CLOUDFLARE_ACCOUNT_ID }}
          command: deployCode language: PHP (php)
One important part to explain is the env part, namely:
env:
    CLOUDFLARE_PROJECT_NAME: ${{ vars.CLOUDFLARE_PROJECT_NAME }}
    CLOUDFLARE_API_TOKEN: ${{ secrets.CLOUDFLARE_API_TOKEN }}
    CLOUDFLARE_ACCOUNT_ID: ${{ secrets.CLOUDFLARE_ACCOUNT_ID }}
These are set in the repository settings and an important distinction needs to be made betweek the vars. and the secretes.. As one might expect, the secrets are protected values, while the vars are visible inside the interface. Before running this workflow, you must set these values:
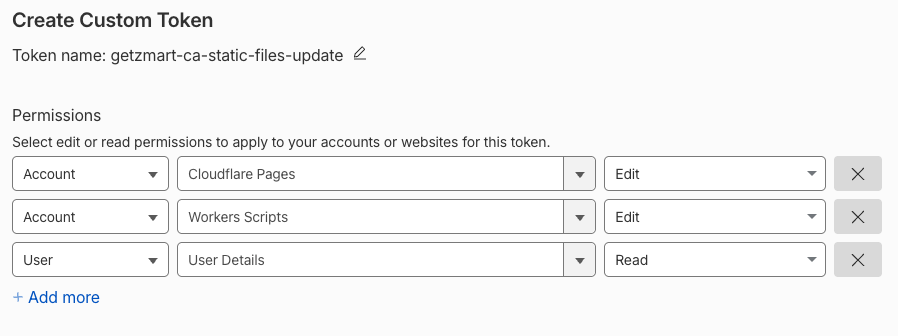
CLOUDFLARE_PROJECT_NAMEis the name of your application, the one you created earlier;CLOUDFLARE_API_TOKENis to be set from the CloudFlare profile tab (currently https://dash.cloudflare.com/profile/api-tokens);CLOUDFLARE_ACCOUNT_IDcan be identified in the URL of the main page of the dashboard (currently: https://dash.cloudflare.com/<account id>/home).
Be sure to minimally have these permissions on your CloudFlare token:
Up until recently, I have used Zoho Mail for forwarding email to my Gmail inbox and for sending emails with some special settings in my Gmail account. However, recent changes in their available packages have made this impossible. But you can still use it as your inbox for your custom domain. The first step will be to create a new account. You can do that here:
For email hosting, you can use CloudFlare as well. It seems that some of the emails are not always forwarded, but it has a nice interface and they are pretty easy to use:
Other valid solutions are: