


In the age of privacy, owning your own NAS is something you might be interested in. Apart from privacy, another possible benefit is reducing your cloud provider bills and maybe increase your comfort online.
Off the top of my head, to reduce the cloud bills we can use Immich to locally store the photos and videos instead of with Google or Apple. For increasing the online comfort, the first thought is using a Pi-Hole instance. We will also use this NAS slightly beyond its declared purpose of network storage to host a development environment.
The hardware we will use is a UGREEN DXP4800+ with 16GB of RAM in tandem with a UPS NJOY Keen 600 USB, 600VA, AVR, Schuko. The former is the result of extensive research and has been chosen for its very-very good hardware. It will be used with 4x4TB NAS hard drives and 2x1TB SSD drives. The latter was just the UPS available on my closest hardware store that day. Given that hard drives and SSDs have become pretty expensive lately, adding some protection for them seemed like the mandatory thing to do.
An important idea if you want to use a NAS for your data is that you need to learn a bit more about storage best practices (e.g. the 3-2-1 rule, 3 copies of the data, on 2 types of media, one of them being off-site).
More info:
- https://ai.ugreen.com/products/ugreen-nasync-dxp4800-plus-nas-storage
- https://www.truenas.com/truenas-community-edition/
- https://youtu.be/QsM6b5yix0U
Initial setup
UGREEN has a very nice solution for the OS out of the box, so deciding to permanently switch to TrueNAS was quite a hard choice. One important and objective argument was ZFS support. The more subjective one was related to how the users were managed, the application support and the interface itself - if I have the choice, I will go with something fully web based, instead of something which imitates a desktop environment inside a browser window.
I will not go though the exact steps of the initial configuration, as the internet is full of tutorials. But I will enumerate some of the choices I made, together with some important steps:
- I used my Ventoy USB stick to load the TrueNAS installer (I have described creating that in my previous article about the LLM on an older laptop, linked below);
- The first choice was to install the OS directly on the internal SSD. It's not easy to switch between OSs and keep the data, so it does not make much sense to have multiple operating systems. Also, the original OS is available for download from UGREEN;
- Another choice was about how to setup the pools. After multiple tutorials, I decided for two separate pools, one for storage named
tankwith RAID-Z2 and one for apps with the same name and RAID-1.
Read more:
- https://youtu.be/ucN9YDKoezY
- https://youtu.be/67KtKoW4IM0
- https://draghici.net/2026/04/24/convert-an-old-laptop-into-a-llm-machine/
- https://ai.ugreen.com/pages/downloads
- https://datazone.de/en/aktuelles/zfs-raid-levels-explained/#:~:text=ZFS%20doesn't%20use%20traditional,%2C%20performance%2C%20and%20fault%20tolerance.
- https://youtu.be/M4DLChRXJog
Start the BIOS without F12
To perform the install, you need to connect the NAS to a monitor, together with a keyboard and mouse. My external USB keyboard did not have the F12 key easily available, so to start into the BIOS to disable the watchdog I had so "hack" my way inside, with some help from OpenAI:
Because the Ugreen NAS uses standard UEFI architecture, you can tell GRUB to force the motherboard to open the BIOS on the next restart. Here are two ways to do exactly that:
Option 1: The GRUB Command (fwsetup)
If you have a keyboard and monitor plugged into the NAS, you can bypass the F-keys entirely using the GRUB command line.Turn on the NAS. The moment you push the power button, rapidly tap the Esc, Shift, or c key repeatedly. You are trying to interrupt the boot process to catch the Ugreen GRUB menu before the OS loads. Once you are on the GRUB selection screen, press c. This will drop you into the GRUB command prompt. Type the following command and press Enter:
fwsetup
Option 2: The OS Command (If you are already booted into UGOS)
If the NAS boots up too fast for you to catch the GRUB menu, you can send a similar command directly from the Ugreen operating system. Log into your Ugreen NAS web interface. Enable SSH in the control panel. Open a terminal on your main computer (Terminal on Mac, Command Prompt/PowerShell on Windows) and SSH into the NAS. Once you are logged into the Ugreen command line, type the following command and press Enter:
sudo systemctl reboot --firmware-setup
The NAS will shut down and automatically power back up straight into the BIOS. Once the blue/grey BIOS screen appears, you can navigate to the Advanced tab, find the F81803 menu, disable the WatchDog, and then plug your TrueNAS USB drive in to start your installation!
Power management
To configure the UPS, we need to go to System > Services and toggle the UPS service. However, the first time you might encounter a problem because the service is not correctly configured. Click the edit icon and make sure you add all the needed values, which in my case were:
| Setting | Value |
|---|---|
| Mode | Master |
| Identifier | ups |
| Driver | usbhid-ups |
| Port | auto |
| Monitor User | upsmon |
| Monitor Password | Any strong password |
| Shutdown Mode | UPS goes on battery |
| Shutdown Timer | 60 seconds |
We can also check the "Power Off UPS" checkbox. To test the configuration, we can just unplug the UPS battery from the electric grid and see if they shudown.
For powering on after a power loss, make sure that the BIOS is properly configured: Advanced > Power Settings:
Power Lossshould bePower OnorLast State
Wakeup manually
As an emergency wake up, with the help of GPT I have created this script which will run on a Raspberry Pi existing in the network:
#!/usr/bin/env python3

import argparse
import ipaddress
import re
import socket
import sys


def create_magic_packet(mac):
    mac = mac.replace(":", "").replace("-", "").lower()

    if not re.fullmatch(r"[0-9a-f]{12}", mac):
        raise ValueError("Invalid MAC address")

    return bytes.fromhex("FF" * 6 + mac * 16)


def get_broadcast(ip):
    # Assume a /24 network
    network = ipaddress.ip_network(f"{ip}/24", strict=False)
    return str(network.broadcast_address)


def send_wol(ip, mac):
    packet = create_magic_packet(mac)
    broadcast = get_broadcast(ip)

    print(f"Broadcast address: {broadcast}")

    with socket.socket(socket.AF_INET, socket.SOCK_DGRAM) as sock:
        sock.setsockopt(socket.SOL_SOCKET, socket.SO_BROADCAST, 1)

        for port in (7, 9):
            sock.sendto(packet, (broadcast, port))
            print(f"Sent magic packet to {broadcast}:{port}")


def main():
    parser = argparse.ArgumentParser(description="Wake a host using Wake-on-LAN.")
    parser.add_argument("ip", help="IP address of the target host")
    parser.add_argument("mac", help="MAC address of the target host")

    args = parser.parse_args()

    try:
        send_wol(args.ip, args.mac)
    except ValueError as e:
        print(e, file=sys.stderr)
        sys.exit(1)


if __name__ == "__main__":
    main()Code language: Bash (bash)
An example run with the static IP and the MAC address of the NAS is:
python3 wake_nas.py 192.168.0.100 AA:BB:CC:DD:EE:F6
For powering on, make sure that the BIOS is properly configured: Advanced > Power Settings:
- Wake on LAN should be Enabled.
Data structures
One of the main reasons why I chose to go with the TrueNAS instead of the original UGREEN operating system is the extra flexibility it offers around configuring users and access. Since it's based on Debian, you get out of the box the full power of a unix files permissions system.
However, one of the challenges that appears is how to structure your data. There are many tutorials explaining the options of TrueNAS, but few are actually opinionated about how to create the permissions and file structures. So we will attempt to do that in the following lines.
See more:
File structure
Since creating users requires having a home directory, we will start with handling the file structure and then create the users and groups. One idea is the following:
tank/
├── users/
│   ├── alice/
│   └── bob/
│
├── shared/
│   ├── common/
│   │   ├── documents/
│   │   ├── downloads/
│   │   └── media/
│   │
│   ├── family/
│   ├── work/
│   └── friends/
│
├── backups/
│   ├── pc-bob-1/
│   ├── laptop-alice-1/
│   ├── phone-alice/
│   ├── server-webhosting-1/
│   └── truenas/
│
├── media/
│   ├── movies/
│   ├── tv/
│   ├── music/
│   ├── audiobooks/
│   └── photos/
│
├── downloads/
│   ├── incomplete/
│   └── complete/
│
├── vm-storage/
│
└── scratch/

apps/
├── ix-applications/
├── appdata/
│   ├── jellyfin-config/
│   ├── immich/
│   └── postgres/
│
├── cache/
│   ├── jellyfin/
│   ├── immich/
│   └── thumbnails/
│
└── vm-storage/
We will use multiple datasets, mainly for the ability of creating different backup rules and settings different options (e.g. one user might want their files encrypted, or we might not want backups for cache files). From the above, we will create the minimal necessary for a basic installation.
The first datasets we will create are the following
tank/ # hdd pool
├── users/ # main dataset for users
│   ├── alice/ # each user will have their own dataset
│   └── bob/
│
├── shared/ # main dataset for shared data
│   └── common/ # each group of files will have their own dataset and group
│
├── backups/ # dataset for backups
│
├── media/ # dataset for media
│
├── downloads/ # dataset for downloads
│
├── vm-storage/ # VMs
│   └── dev-1/ # each VM will have their own dataset and group
│
└── scratch/ # digital workbench, for temporary files

apps/
├── ix-applications/ # black box for TrueNAS apps
│
├── appdata/ # configurations, databases, static assets etc
│
├── cache/ # cache files, no backup
│
└── vm-storage/ # VMsCode language: PHP (php)
See more:
Users and Groups
We will aim for a simple structure at first and in time extend it. Each person will have their own user, they will belong to groups. There will be a common area for documents and media which will be accessible by a certain group.
One important thing to remember is the principle of least privilege, which mainly states that you should not give a user rights that are not necessary.
The first user we will create is bob, who will be able to access the system via ssh. For that, we need to enable the SSH service in System > Services. Adding users will be done in Credentials > Users.
Under the assumption that this is a home system where the number of users is limited, the suggested ideas for groups are:
- Each user will have their own group;
- Each of the datasets in
sharedwill have their own group which can be assigned to users; - Each VM will have their own group.
First samba share
We will now create the first share, on the /tank/shared/common dataset. This will be as easy as going to Shares and adding a new Samba share for the mentioned path.
One thing to keep in mind is that you need to be sure that the user has access to the dataset. For that:
- following the convention above, we need to make sure that a group exists with the name of the dataset (e.g.
dataset-common) and it owns the dataset; - we need to make sure that the users we want to be able to access the dataset are part of that group;
- we need to make sure that the permissions are the equivalent of
770.
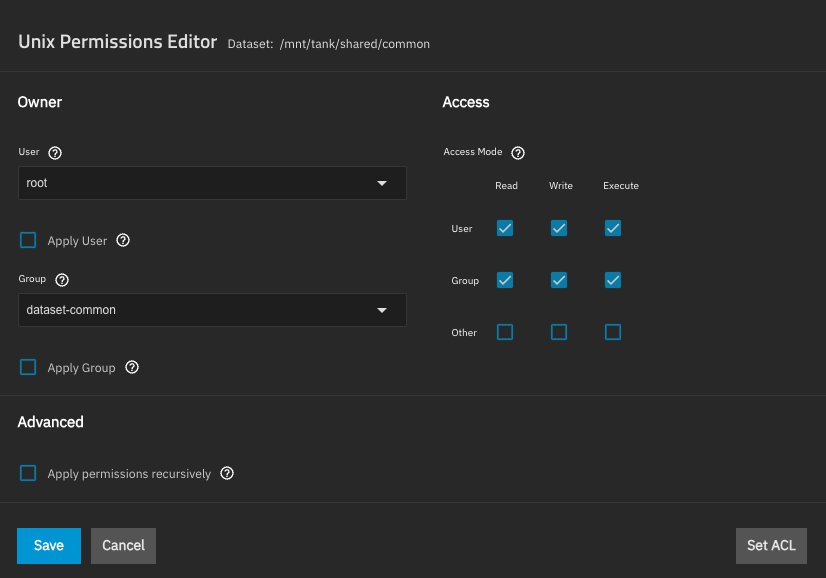
One important thing to remember is that your operating system might cache the permissions. So if you encounter problems, unmount or eject your mounts and try the path again:
- smb://192.168.0.20 (or whichever your TrueNAS ip is)
Backups
Another important aspect is creating backups and data integrity jobs. For doing this we will go to the Data Protection section. Here are some ideas for how to create backups:
- Backup your user folders;
- Never backup cache.
Applications
One of the nicer things TrueNAS brings to the table is the applications section, under Apps. Before doing anything, be sure to refresh the apps catalog. That will help prevent possible issues.
As a base for storage, we will create the following
apps/                              # ZFS dataset
├── appdata/                       # ZFS dataset
└── cache/
tank/
└── apps/                          # ZFS datasetCode language: PHP (php)
Pi-Hole
The first application we will install is Pi-Hole. This is as easy as searching to the application in the list, clicking the install button and completing the form which is already pre-filled with the necessary values.
Once installed, we will do some changes after logging into the admin web interface of Pi-Hole:
- in
System > Settings > DNSand there we will switch to using Quad9 and Cloudflare for solving DNS queries; - another thing to update is the
Group Management > Listswhich manages the blocked IPs lists.
To check if the DNS is working, you can use some terminal commands:
- on Windows:
nslockup google.com 192.168.0.20 - on Linux/macOS:
dig @192.168.0.20google.com
If the above commands return a query, then you can setup your computer resolver or update your router to use the IP of the NAS as the main resolver for DNS.
Once challenge you might face is that TrueNAS will not be able to solve DNS for itself. If you face this, what you need to do is:
- Go to
System > Networkand click the Settings button on "Network Configuration"; - As a fallback add the
1.1.1.1secondary DNS server.
See more:
- https://draghici.net/2023/08/07/setting-up-my-new-raspberry-pi/
- https://github.com/hagezi/dns-blocklists
Immich
One of the champions for replacing Google Photos with a locally hosted solution is Immich. We will use the apps provided by TrueNAS, but before we will create a pretty particular dataset structure:
apps/
└── appdata/
    └── immich/                    # ZFS dataset — Immich app state
tank/
└── apps/
    └── immich/                    # ZFS dataset — Immich media/dataCode language: PHP (php)
We will create the datasets above, using the default preset (Generic) and most of the default options. For tank/apps/immich we can use the Advanced Options to change the following:
- add encryption for the files;
- increase the Record Size to 1M, as it will be dealing with big files.
If you don't want the custom config for tank/apps/immich, you can create the volumes from the command line with:
zfs create -p apps/appdata/immichzfs create -p tank/apps/immich
We could decrease the Record Size for apps/appdata/immich, since there we will be having many small file.
Then we can install Immich, using the options provided by TrueNAS:
- Go to
Applications > Discoverand findImmich, then click the install button; - You can disable Machine Learning if you are not interested in that;
- Add the
0.0.0.0ip to Host IPs and keep "Publish port on the host for external access" option; - Configure the storage, leaving "Enable ACL" unchecked:
- Data Storage (aka Upload Location) should be transformed to "Host Path", with the value:
/mnt/tank/apps/immich
- Postgres Data Storage should be transformed to "Host Path", with the value:
/mnt/apps/appdata/immich
- Data Storage (aka Upload Location) should be transformed to "Host Path", with the value:
Once you click the install button, you should be able to see the Web UI link which will take you to the app.
See more: